You will learn how to create a BigCommerce API account in this tutorial. Every business’s need to create an API account is crucial; once we create an API account, we will get useful information such as “API path”, “Client ID”, “Client Secret”, and “Access token”… these credentials will be used for all API calls using the token.
A BigCommerce API account can be created in just three steps.
Step 1: Access API from the BigCommerce Admin account

Step 2: Create an API Account
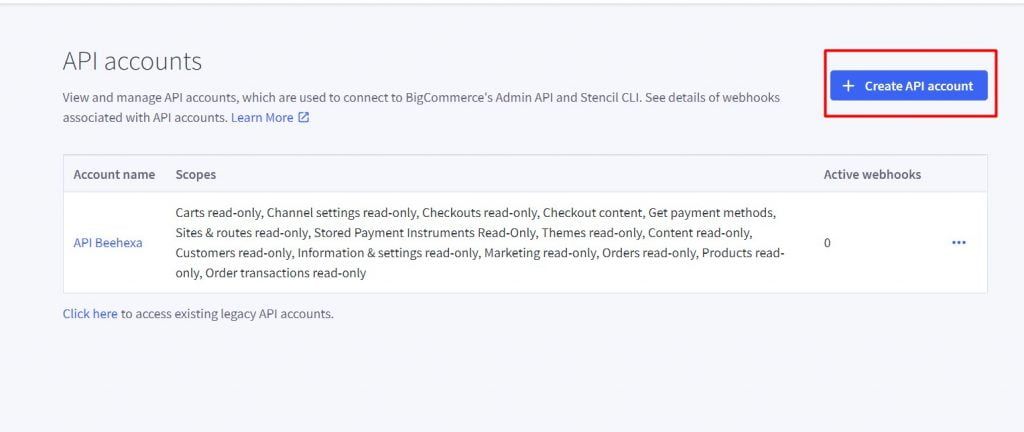
Each store can create a maximum of 50 accounts. So, here are the steps to create an API account:
- Firstly, go to the Home page
- Secondly, Select the Advanced settings section
- Then Click on API Accounts new
- Now, click on the Create API account button on the screen’s right-top.

Step 3: Setting API Account
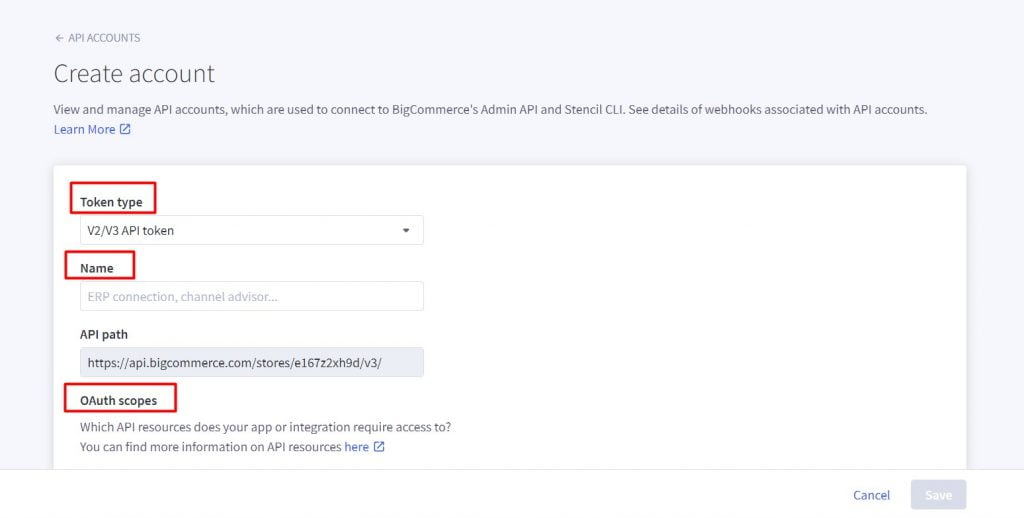
We must set up the BigCommerce API account and its properties before saving it. And here is how:
1. Select Token type
- V2/V3 API token
- Stencil CLI token
Select the type of account. This will determine whether the new account is a V2/V3 API token or a Stencil-CLI token used in Theme customization. In the case of stencil-CLI tokens, you can select the access level. If you want to know more, see Live Previewing a Theme in the Dev Center.
2. Name API account
You’ll need the API path to use the API account, so create a name for the integration or app associated with this account. The name must contain at least four characters.
3. Setting OAuth scopes
OAuth Scopes allows you to specify the API resources and permissions your app/integration needs.
Besides, you can customize and control your store’s data access with OAuth Scopes. Check out our API documentation for more information.

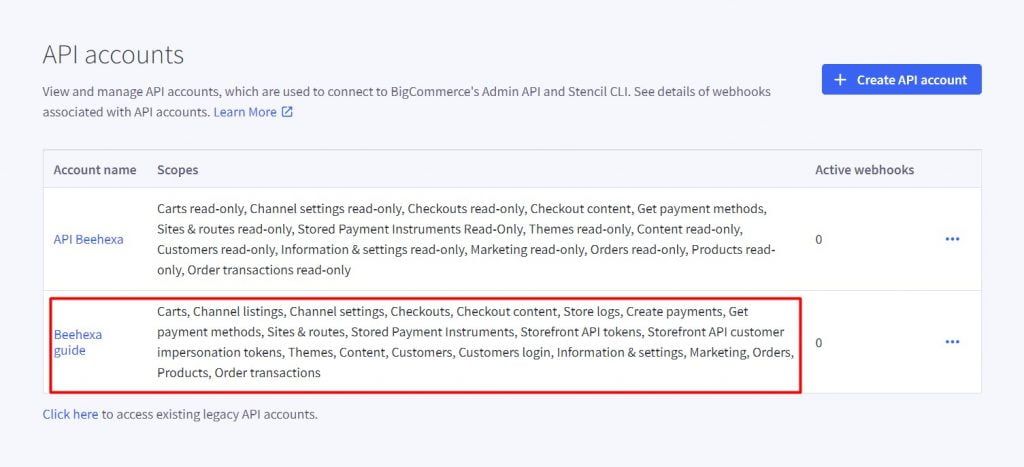
In the following table, you can find a list of all OAuth Scopes and their permissions.
- Content — edit web pages, blog posts, and widgets in the store
- Checkout Content — read and create checkout scripts
- Customers — keep track of customers, customer groups, and wish lists
- Customers Login — manage customers, log in to storefront accounts
- Information & Settings — customize store information, such as contact details, date and time preferences, and default language
- Marketing — manage marketing banners, coupon codes, and gift certificates
- Orders — update order statuses and manage orders
- Order Transactions — Check the payment instruments used to pay for an order
- Create Payments — make a payment for an order
- Get Payment Methods — View the accepted payment methods.
- Stored Payment Instruments — see a customer’s stored payment methods
- Products — view and modify product information, including images, variants, modifiers, categories, brands, and price lists
- Themes — backup, restore, download, and apply themes
- Carts — Create and view carts
- Checkouts — add checkouts to existing carts
- Sites & Routes — connect headless storefronts to sales channels and manage linked pages.
- Channel Settings — view and modify marketplace, POS, and storefront channels connected to your store.
- Channel Listings — manage catalog differences across different storefronts and marketplaces.
- Storefront API Tokens — create tokens used to authenticate cross-origin requests to the GraphQL Storefront API.
- Storefront API Customer Impersonation Tokens — create tokens that allow you to view the GraphQL Storefront API as a specific customer.
- Store Logs — view store logs of staff activity and system events
Several scopes are restricted, such as Store Logs as read-only.

4. Click save to finish

Note: When you have done making changes, click Save. It will show a pop-up tab when your changes have been saved successfully. It contains the API credentials that your app will need to access OAuth.

Please keep your credentials! Once you select Done to dismiss this pop-up, there is no way to return to it.
The above are all steps to create a BigCommerce API account. Please comment below or refer to our BigCommerce API documentation if you have any questions.
In the video below, you will see these steps visually:
Hopefully, you can do it!
