Managing customers is very important for each business. From customers’ information, you can run marketing campaigns, send marketing emails, or remind customers to create an account if they don’t have one before to become loyal customers.
For the reason above, today, Beehexa will help you create, update and delete a customer by Shopify API. This is one of the necessary conditions for your business if you want to manage customers effectively and retain customers for a long time.
Create A Customer Using Postman In Shopify
Step 1: Generate API credentials from the Shopify admin
-
- Log in to your Shopify admin
-
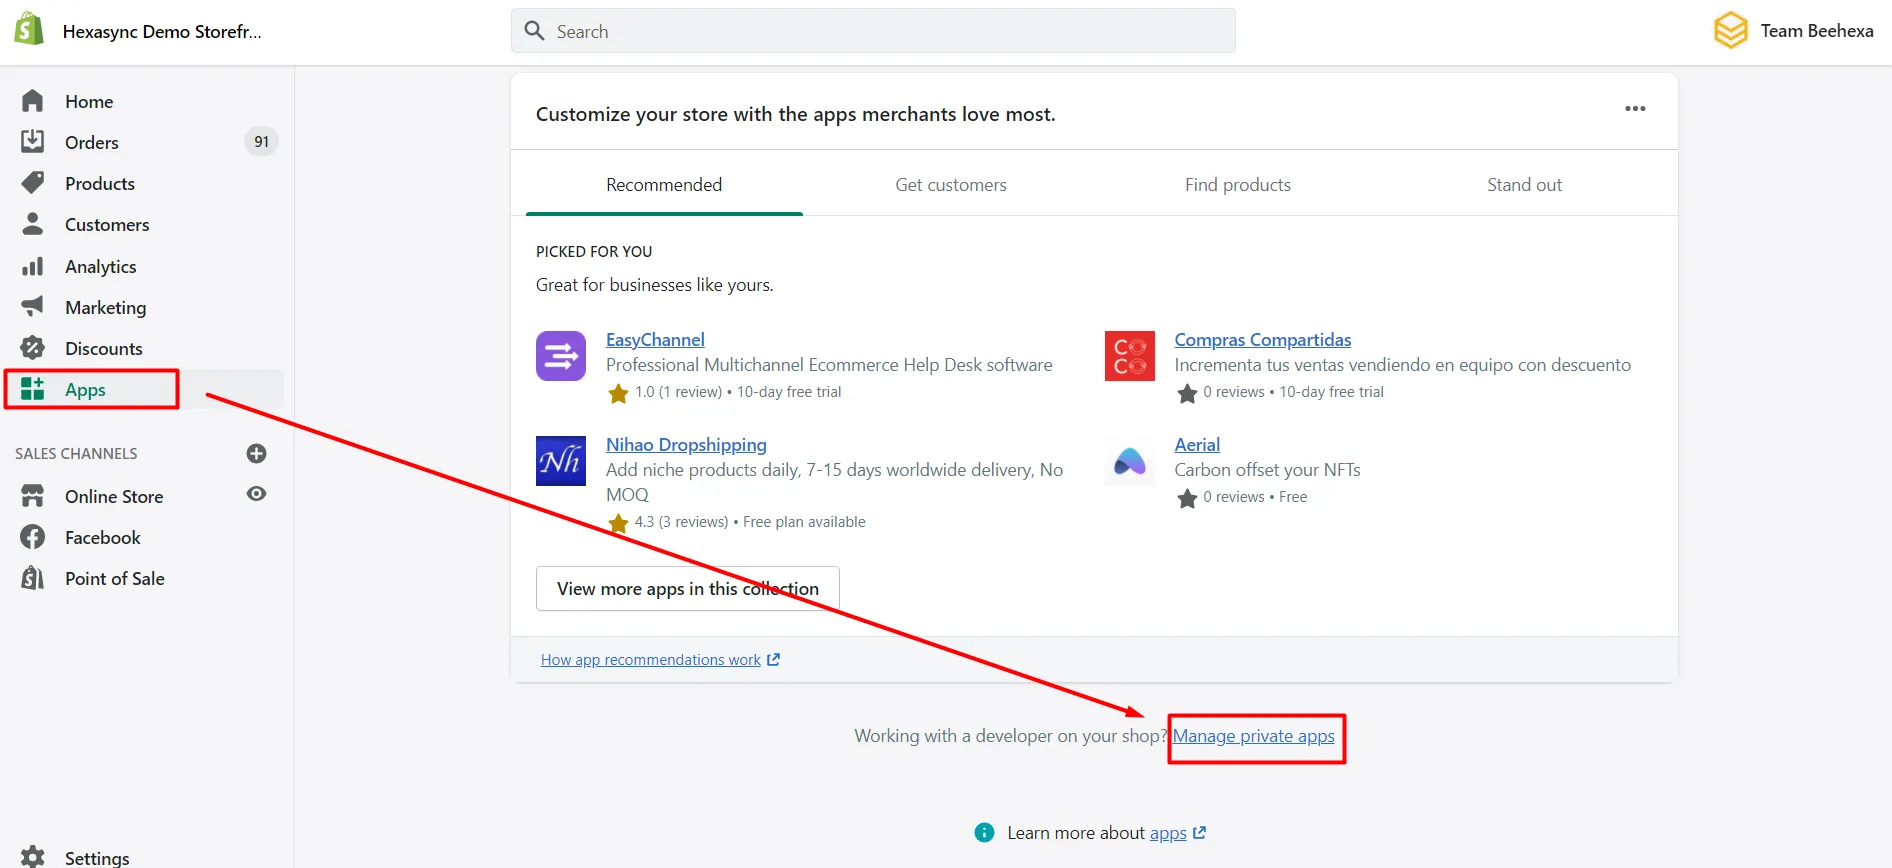
- Go to Apps – Manage private apps
-
- Click Create a new private app
-
- In the App details section, enter a name for your app, and an emergency developer email.
-
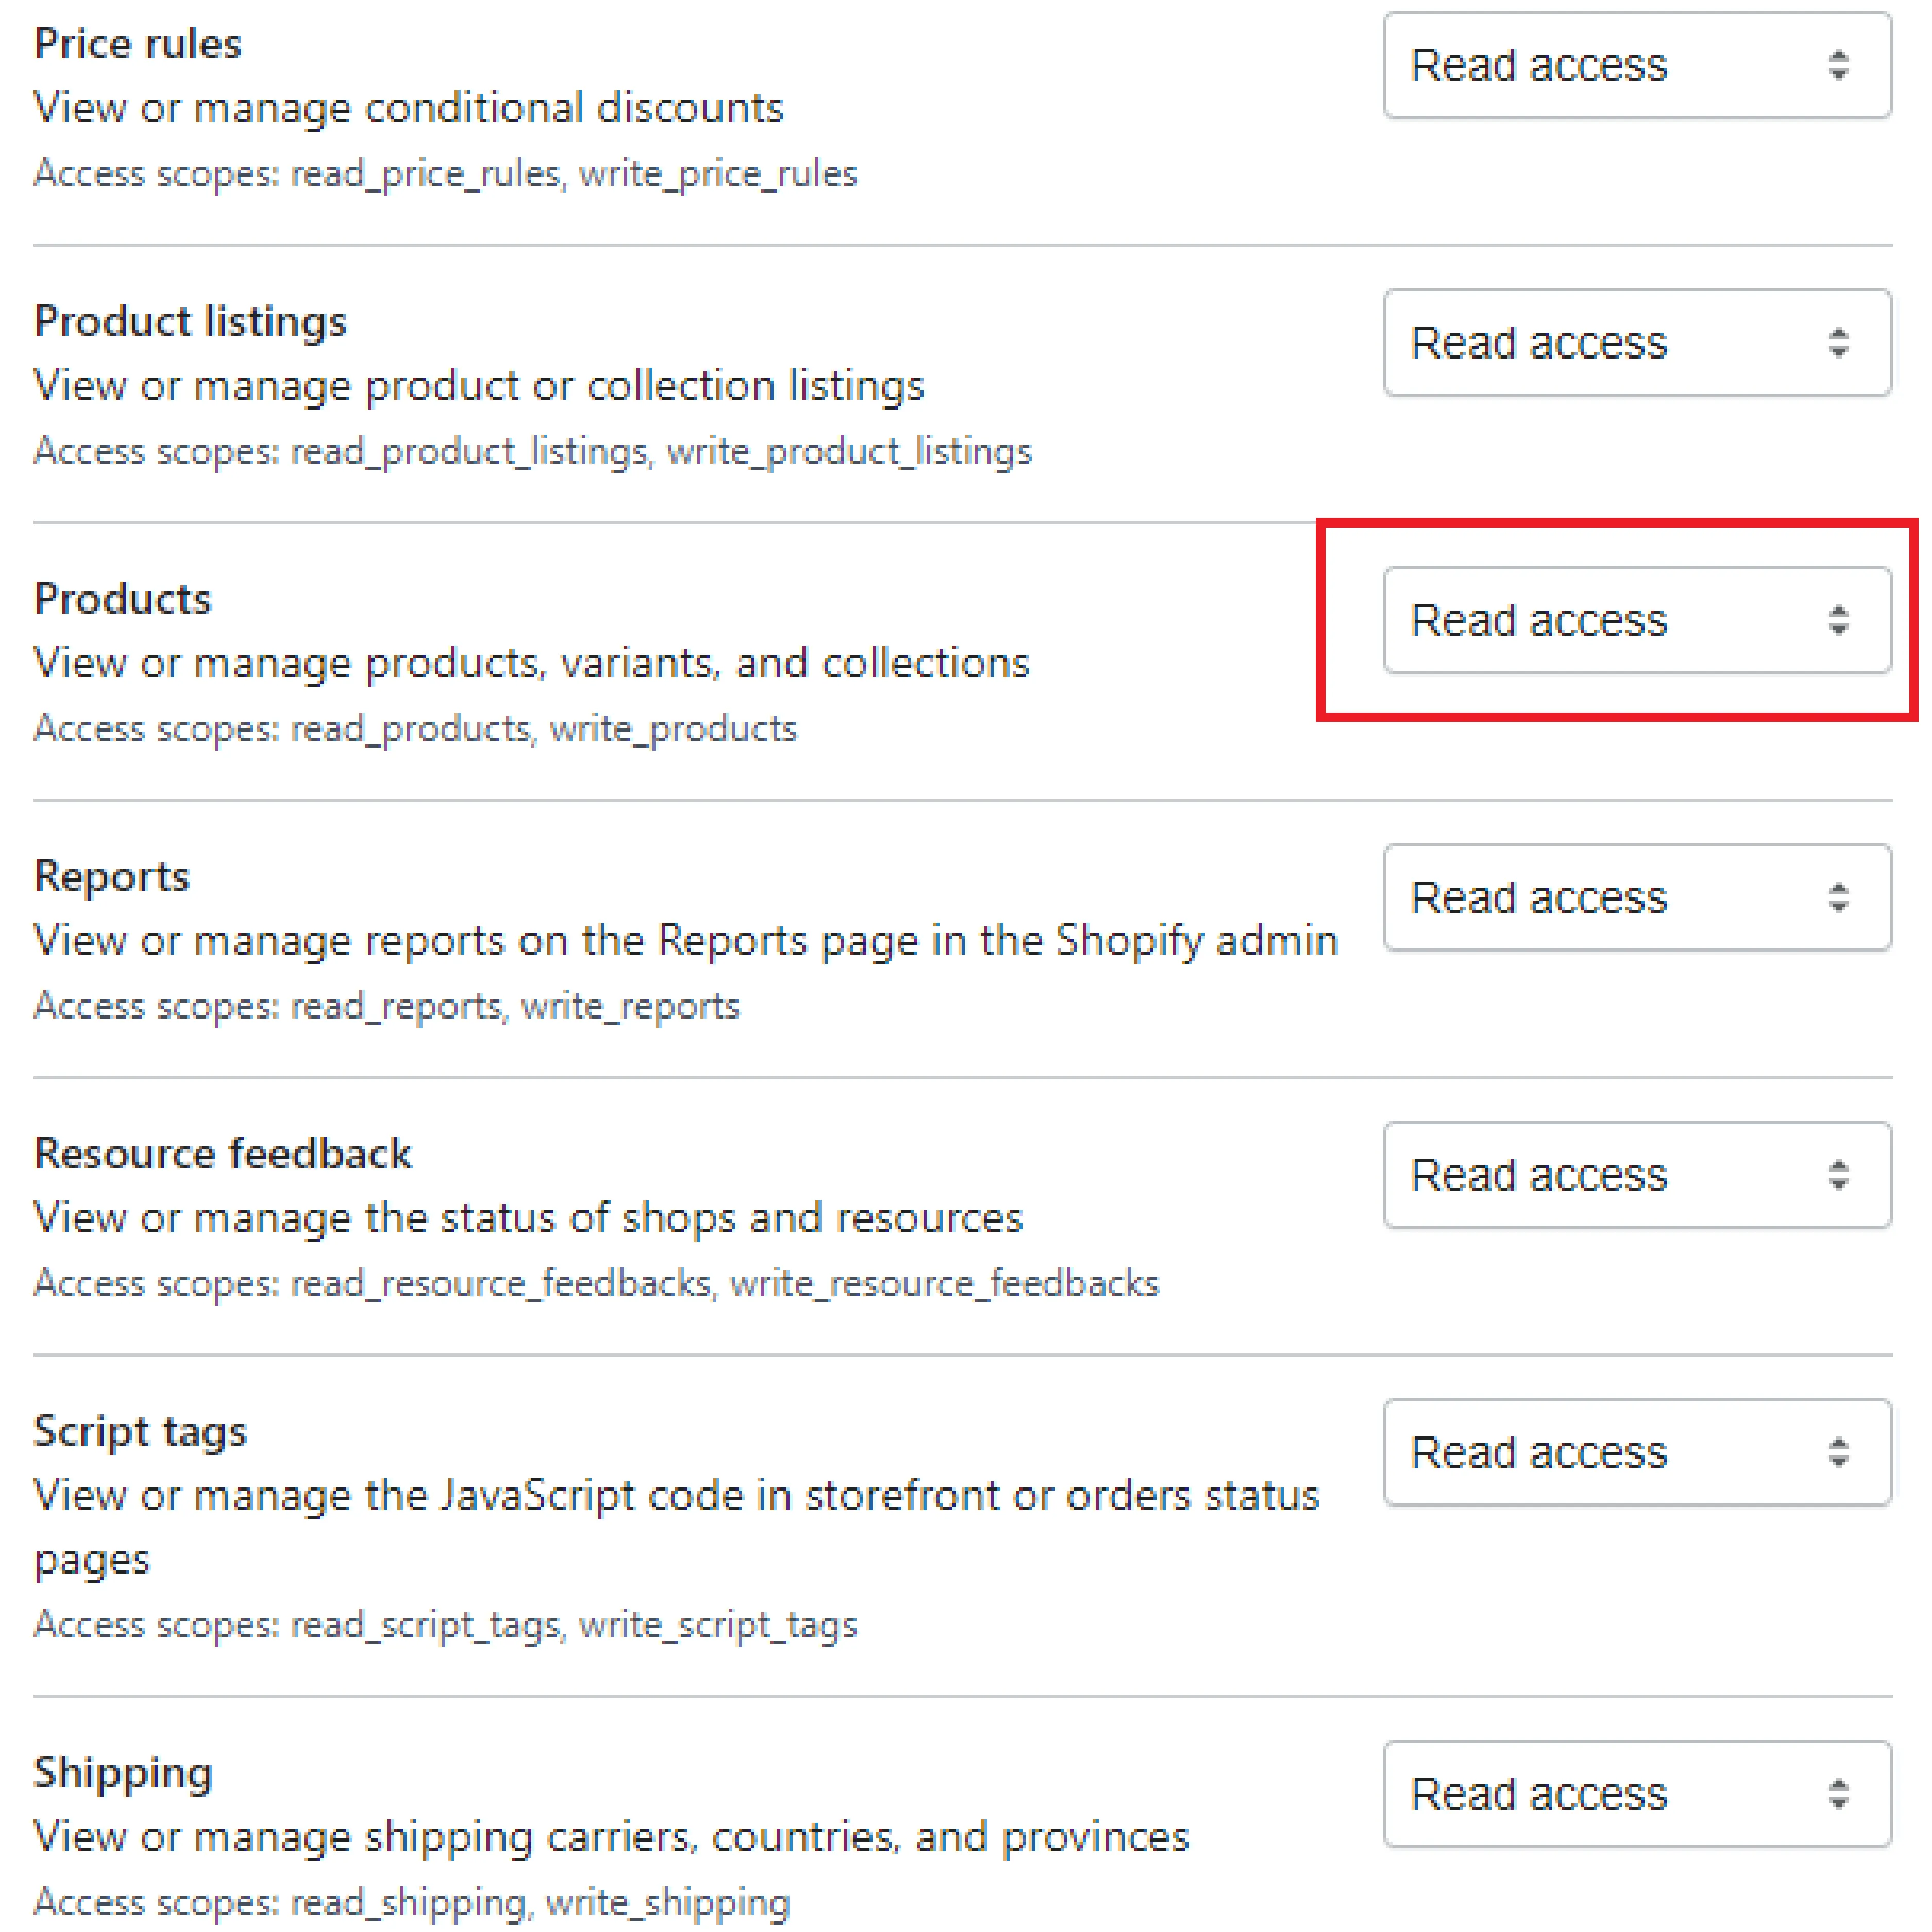
- In the Admin API section, select the areas of your store that you want the app to access
-
- Click Save
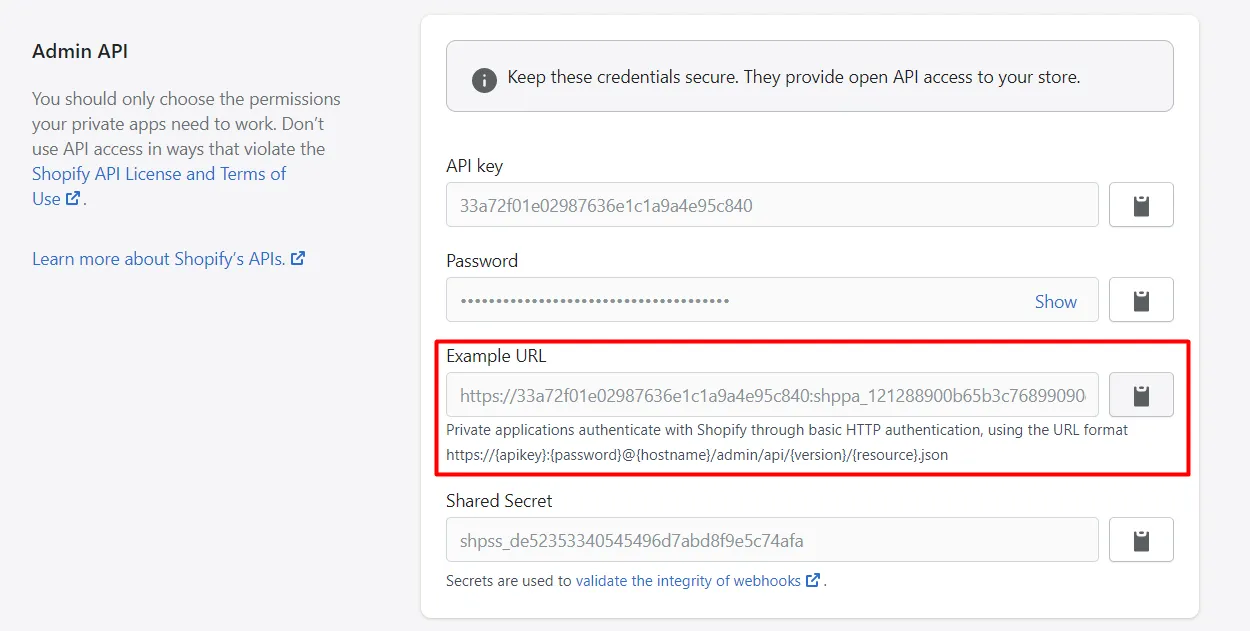
The Admin API section displays the app’s API key and password when you save the app’s details.
Step 2: Create a customer using Postman in Shopify
-
- Log in to your Postman and create a new workspace
-
- Create a new POST with this URL:
https://{username}:{password}@{shop}.myshopify.com/admin/api/{api-version}/{resource}.json
-
- {username} – The API key that you generated.
-
- {password} – The API password that you generated.
-
- {shop} – The name of your development store.
-
- {api-version} – The supported API version that you want to use.
-
- {resource} – A resource endpoint from the REST Admin API.
Or you can copy this example in the Shopify Admin, remember to change {resource} to {customers}:
https://33a72f01e02987636e1c1a9a4e95c840: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@hexasync.myshopify.com/admin/api/2021-10/customers.json
-
- Paste the URL above.

In the body section, enter this code, then click Send.
{
    "customer": {
        "first_name": "Steve",
        "last_name": "Lastnameson",
        "email": "steve.lastnameson@example.com",
        "phone": "+15142546011",
        "verified_email": true,
        "addresses": [{
            "address1": "123 Oak St",
            "city": "Ottawa",
            "province": "ON",
            "phone": "555-1212",
            "zip": "123 ABC",
            "last_name": "Lastnameson",
            "first_name": "Mother",
            "country": "CA"
        }]
    }
}
Response:
The API will return all information about the created customer.
{
    "customer": {
        "id": 5563892006975,
        "email": "steve.lastnameson@example.com",
        "accepts_marketing": false,
        "created_at": "2021-12-24T12:47:49+09:00",
        "updated_at": "2021-12-24T12:47:49+09:00",
        "first_name": "Steve",
        "last_name": "Lastnameson",
        "orders_count": 0,
        "state": "disabled",
        "total_spent": "0.00",
        "last_order_id": null,
        "note": null,
        "verified_email": true,
        "multipass_identifier": null,
        "tax_exempt": false,
        "phone": "+15142546011",
        "tags": "",
        "last_order_name": null,
        "currency": "AUD",
        "addresses": [
            {
                "id": 6805557837887,
                "customer_id": 5563892006975,
                "first_name": "Mother",
                "last_name": "Lastnameson",
                "company": null,
                "address1": "123 Oak St",
                "address2": null,
                "city": "Ottawa",
                "province": "Ontario",
                "country": "Canada",
                "zip": "123 ABC",
                "phone": "555-1212",
                "name": "Mother Lastnameson",
                "province_code": "ON",
                "country_code": "CA",
                "country_name": "Canada",
                "default": true
            }
        ],
        "accepts_marketing_updated_at": "2021-12-24T12:47:49+09:00",
        "marketing_opt_in_level": null,
        "tax_exemptions": [],
        "sms_marketing_consent": {
            "state": "not_subscribed",
            "opt_in_level": "single_opt_in",
            "consent_updated_at": null,
            "consent_collected_from": "OTHER"
        },
        "admin_graphql_api_id": "gid://shopify/Customer/5563892006975",
        "default_address": {
            "id": 6805557837887,
            "customer_id": 5563892006975,
            "first_name": "Mother",
            "last_name": "Lastnameson",
            "company": null,
            "address1": "123 Oak St",
            "address2": null,
            "city": "Ottawa",
            "province": "Ontario",
            "country": "Canada",
            "zip": "123 ABC",
            "phone": "555-1212",
            "name": "Mother Lastnameson",
            "province_code": "ON",
            "country_code": "CA",
            "country_name": "Canada",
            "default": true
        }
    }
}
Step 3: Verify The Result
In the Shopify Admin, Choose Customers
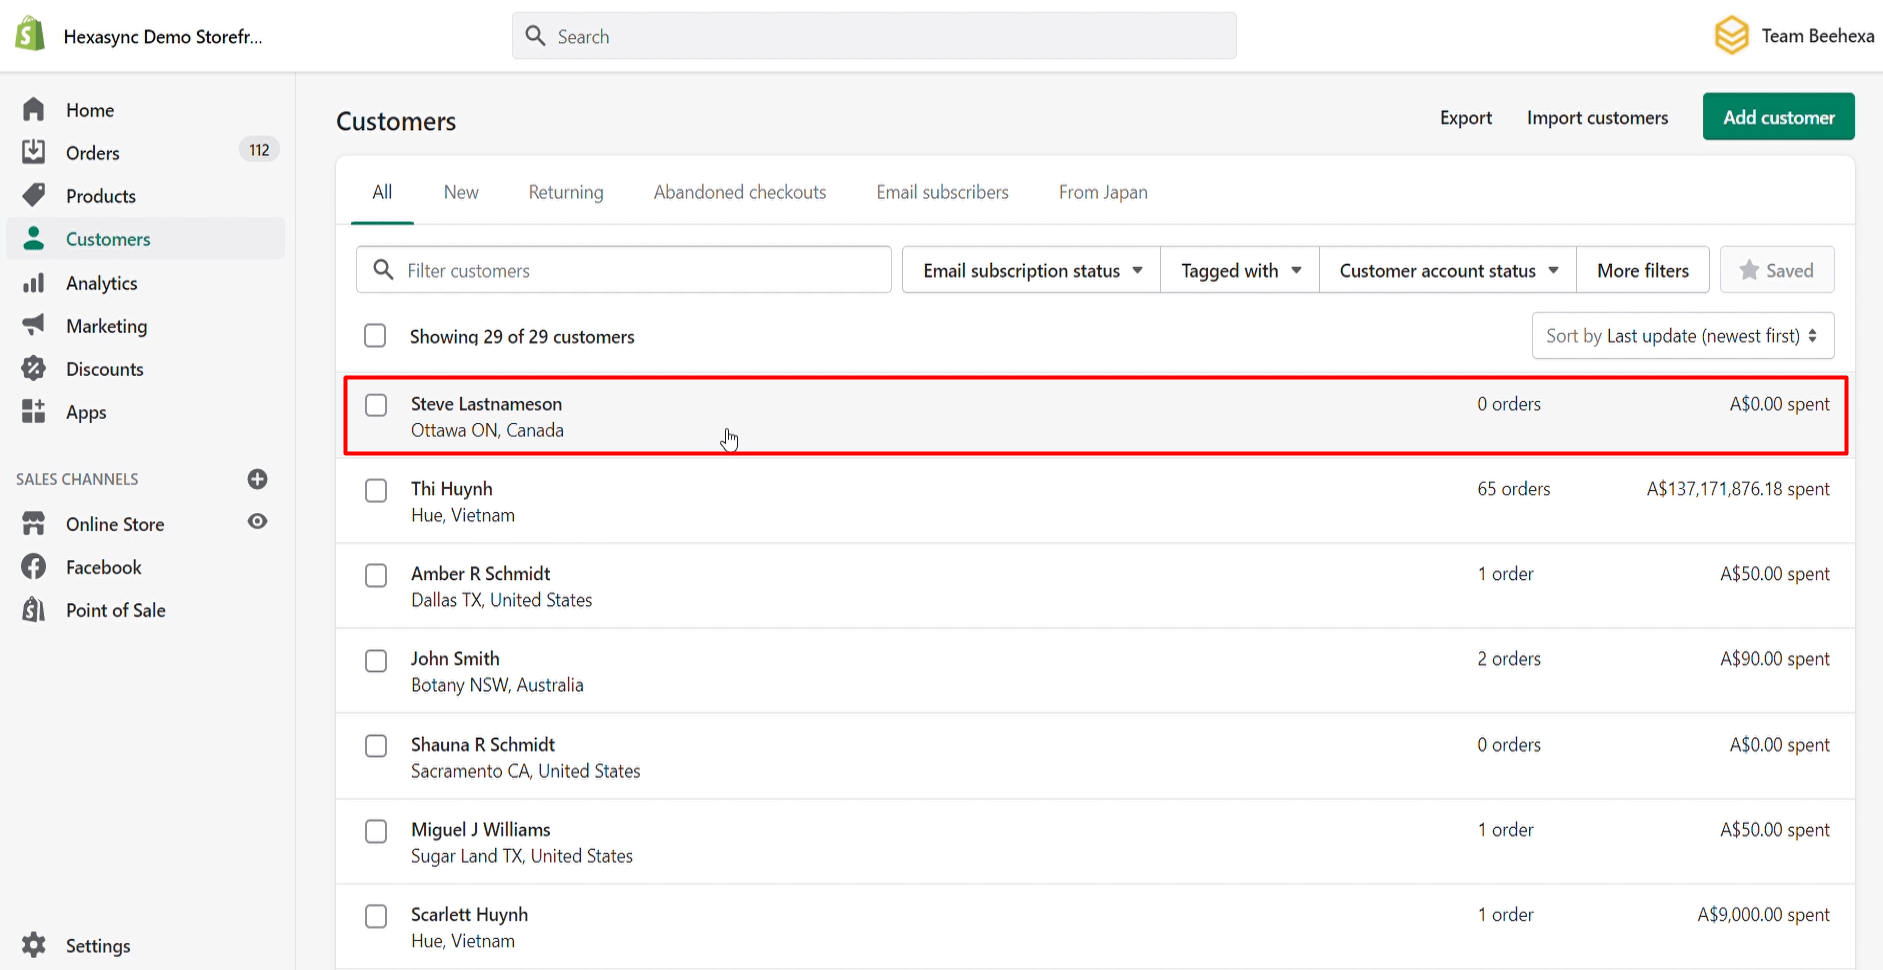
As you can see, the customer has been created successfully.
Updates A Customer Using Postman In Shopify
Before updating the customer, you need to access Shopify API as above.
Step1: Updates A Customer Using Postman In Shopify
-
- Create a new PUT with this URL:
https://{username}:{password}@{shop}.myshopify.com/admin/api/{api-version}/{resource}.json
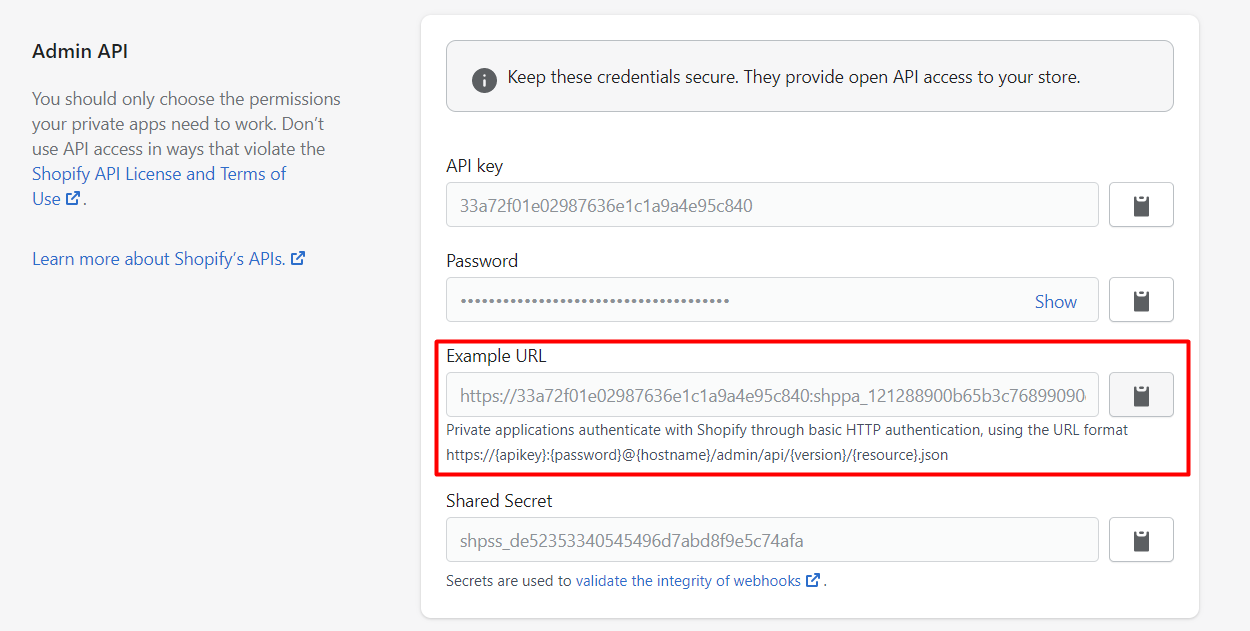
Or you can copy this example in the Shopify Admin, remember change {resource} to {customers/customer_id}:
https://33a72f01e02987636e1c1a9a4e95c840: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@hexasync.myshopify.com/admin/api/2021-10/customers/207119551.json
-
- Paste the URL above.

In this request, I will change the email and notes for the customer.
In the body section, enter this code, then click Send.
{
    "customer": {
        "id": 207119551,
        "email": "changed@email.address.com",
        "note": "Customer is a great guy"
    }
}
Response:
The API will return all information about the updated customer.
{
    "customer": {
        "id": 5563892006975,
        "email": "changed@gmail.com",
        "note": "Customer is a great guy",
        "first_name": "Steve",
        "last_name": "Lastnameson",
        "phone": "+15142546011",
        "accepts_marketing": false,
        "created_at": "2021-12-24T12:47:49+09:00",
        "updated_at": "2021-12-24T12:48:48+09:00",
        "orders_count": 0,
        "state": "disabled",
        "total_spent": "0.00",
        "last_order_id": null,
        "verified_email": true,
        "multipass_identifier": null,
        "tax_exempt": false,
        "tags": "",
        "last_order_name": null,
        "currency": "AUD",
        "addresses": [
            {
                "id": 6805557837887,
                "customer_id": 5563892006975,
                "first_name": "Mother",
                "last_name": "Lastnameson",
                "company": null,
                "address1": "123 Oak St",
                "address2": null,
                "city": "Ottawa",
                "province": "Ontario",
                "country": "Canada",
                "zip": "123 ABC",
                "phone": "555-1212",
                "name": "Mother Lastnameson",
                "province_code": "ON",
                "country_code": "CA",
                "country_name": "Canada",
                "default": true
            }
        ],
        "accepts_marketing_updated_at": "2021-12-24T12:48:48+09:00",
        "marketing_opt_in_level": null,
        "tax_exemptions": [],
        "sms_marketing_consent": {
            "state": "not_subscribed",
            "opt_in_level": "single_opt_in",
            "consent_updated_at": null,
            "consent_collected_from": "OTHER"
        },
        "admin_graphql_api_id": "gid://shopify/Customer/5563892006975",
        "default_address": {
            "id": 6805557837887,
            "customer_id": 5563892006975,
            "first_name": "Mother",
            "last_name": "Lastnameson",
            "company": null,
            "address1": "123 Oak St",
            "address2": null,
            "city": "Ottawa",
            "province": "Ontario",
            "country": "Canada",
            "zip": "123 ABC",
            "phone": "555-1212",
            "name": "Mother Lastnameson",
            "province_code": "ON",
            "country_code": "CA",
            "country_name": "Canada",
            "default": true
        }
    }
}
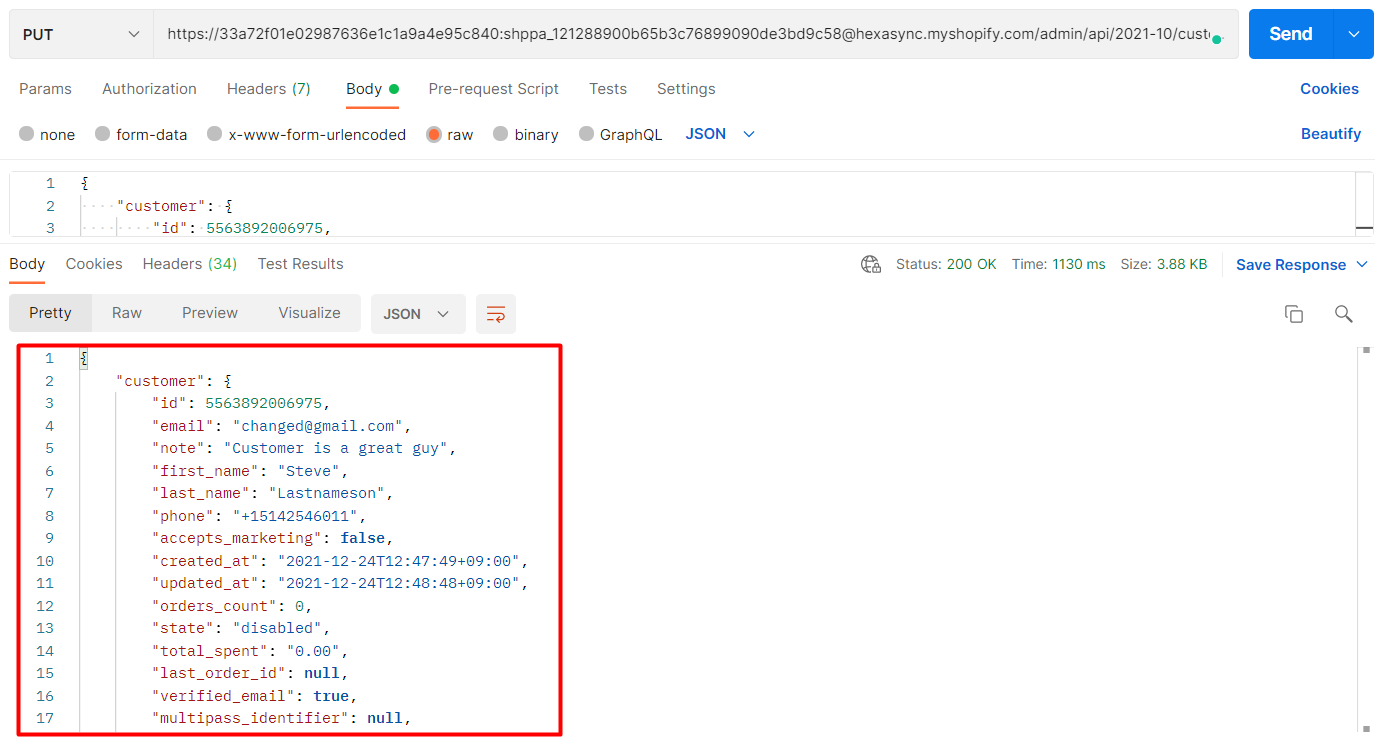
Step 2: Verify the Updated customer
In Admin, choose Customers
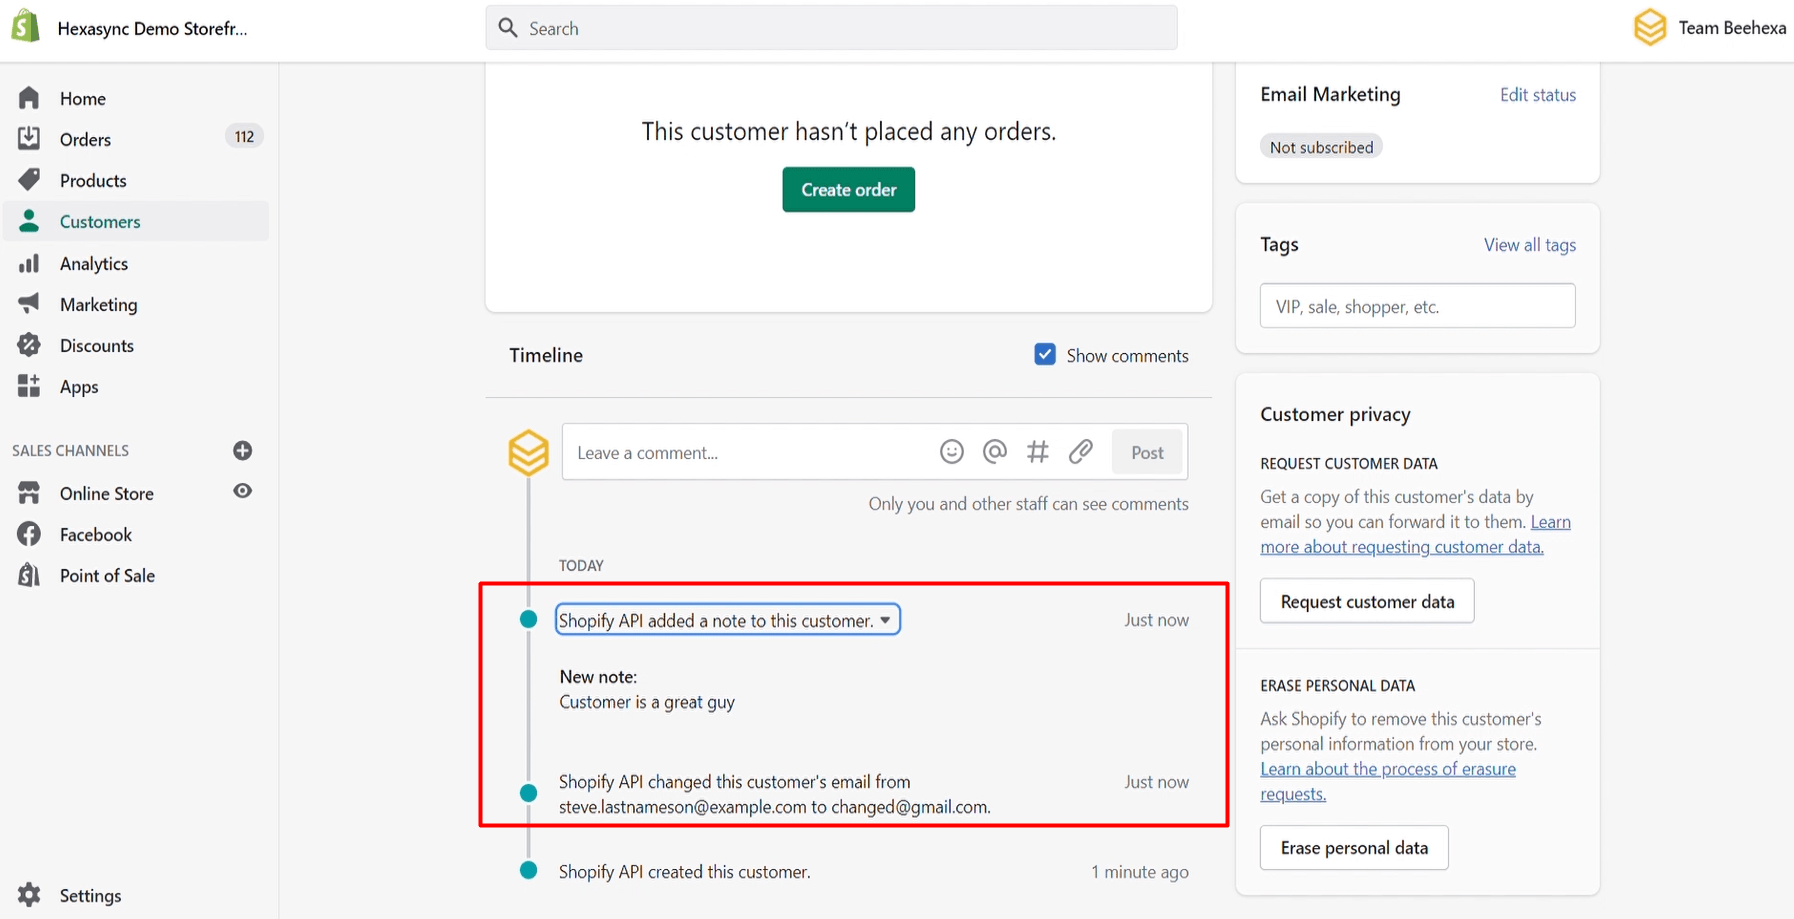
As you can see, the customer has been updated.
Delete A Customer Using Postman In Shopify
Step 1: Delete A Customer Using Postman In Shopify
-
- Create a new DELETE with this URL:
https://{username}:{password}@{shop}.myshopify.com/admin/api/{api-version}/{resource}.json
Or you can copy this example in the Shopify Admin, remember to change {resource} to {customers/customer_id}:
https://33a72f01e02987636e1c1a9a4e95c840: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@hexasync.myshopify.com/admin/api/2021-10/customers/207119551.json
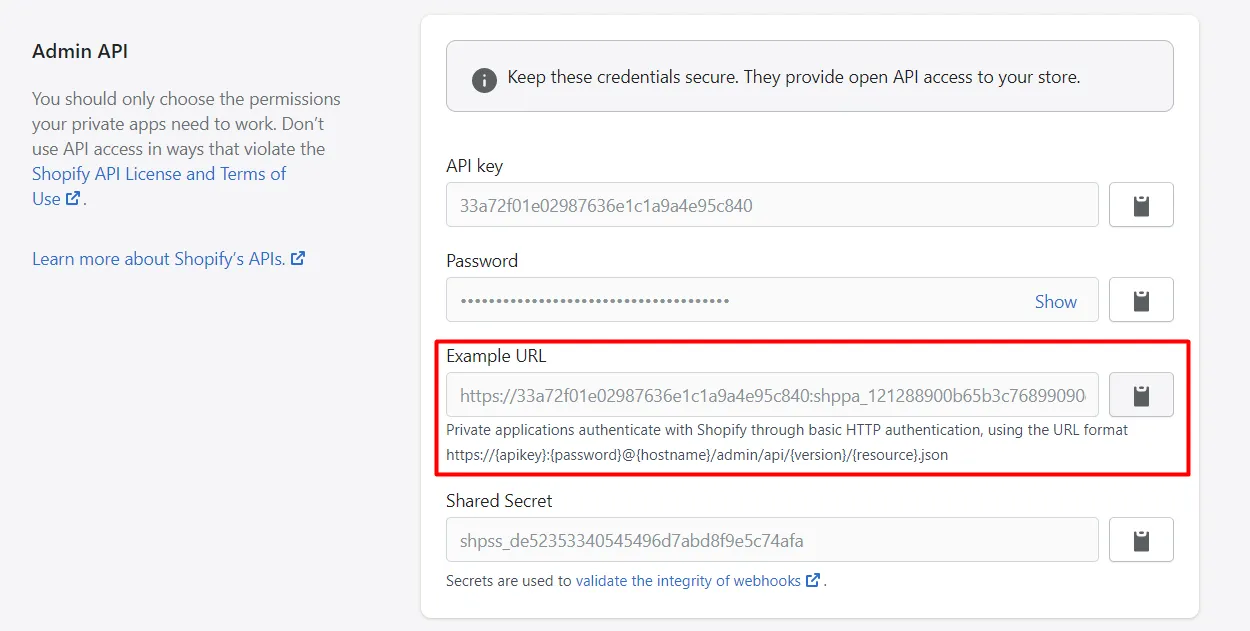
Paste the URL above.

Then Click SEND
Response:
An empty array.
Step 2: Verify the Result
In Admin, choose Customers
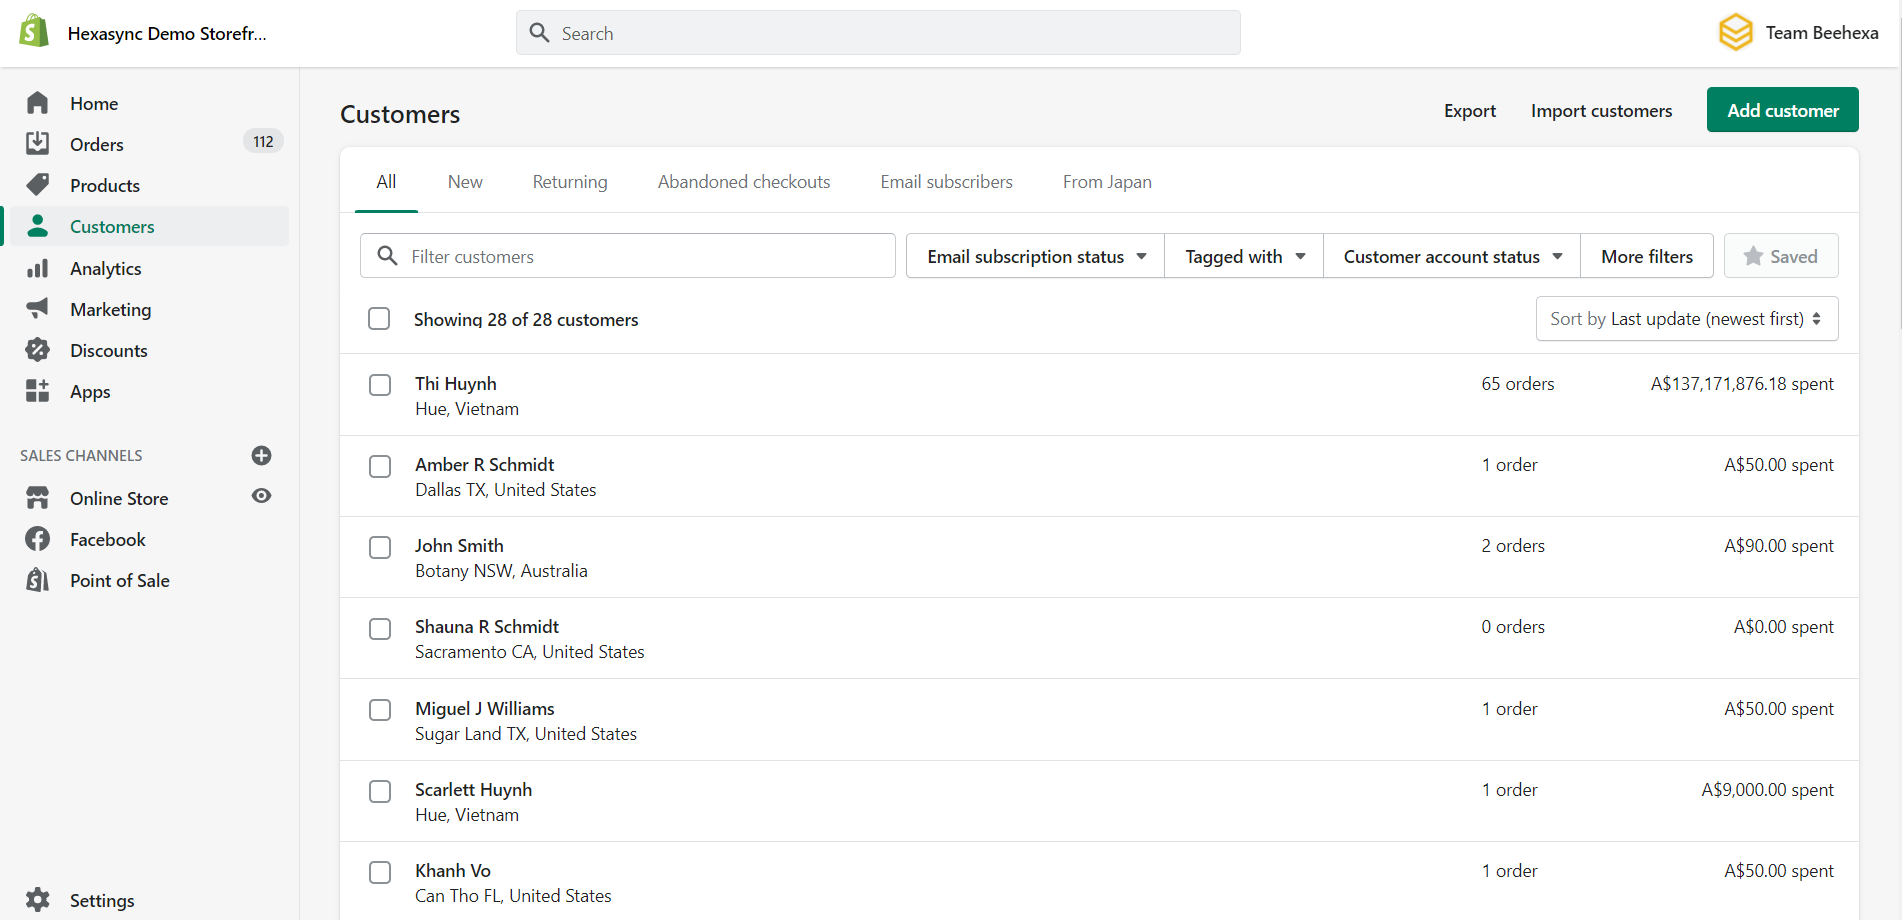
As you can see, the customer has been deleted.
I have shown you all steps to create, update and delete a customer with Shopify API using Postman. If you have any questions, please comment below or refer to our blog: What is an API?. Besides, you can see more Shopify API documentation in the developer docs.
If you still do not understand the tutorial’s content, you can watch the video below for a more overview.
Hopefully, you can do it!