If you have a headache with How to get an access token and refresh the access token of Wix API, this article will help you understand easily from the very beginning.
To make API calls in Wix API, you need to know what an access token and the refresh token are.
- The access token is what applications use to make API calls on behalf of a user. The access token represents the authorization of a specific application to access specific parts of a user’s data. In Wix API, the access token is only valid for 5 minutes.
- The refresh token is a unique token that can be used to get more access tokens. You can have short-lived access tokens without needing to collect credentials every time one expires.
Now, let’s dive into this subject a little deeper.
The process of getting an access token and refreshing the access token includes 4 steps:
- 1: Create an app on the Wix developer website.
- 2: Install the app and get the token.
- 3: Get the code.
- 4: Get the access token and refresh the access token.
Step 1: Create an app on the Wix developer website
To get the access token and the refresh token in Wix, you need to create an app first.
Now, take step 1, create an app on the Wix developer website.
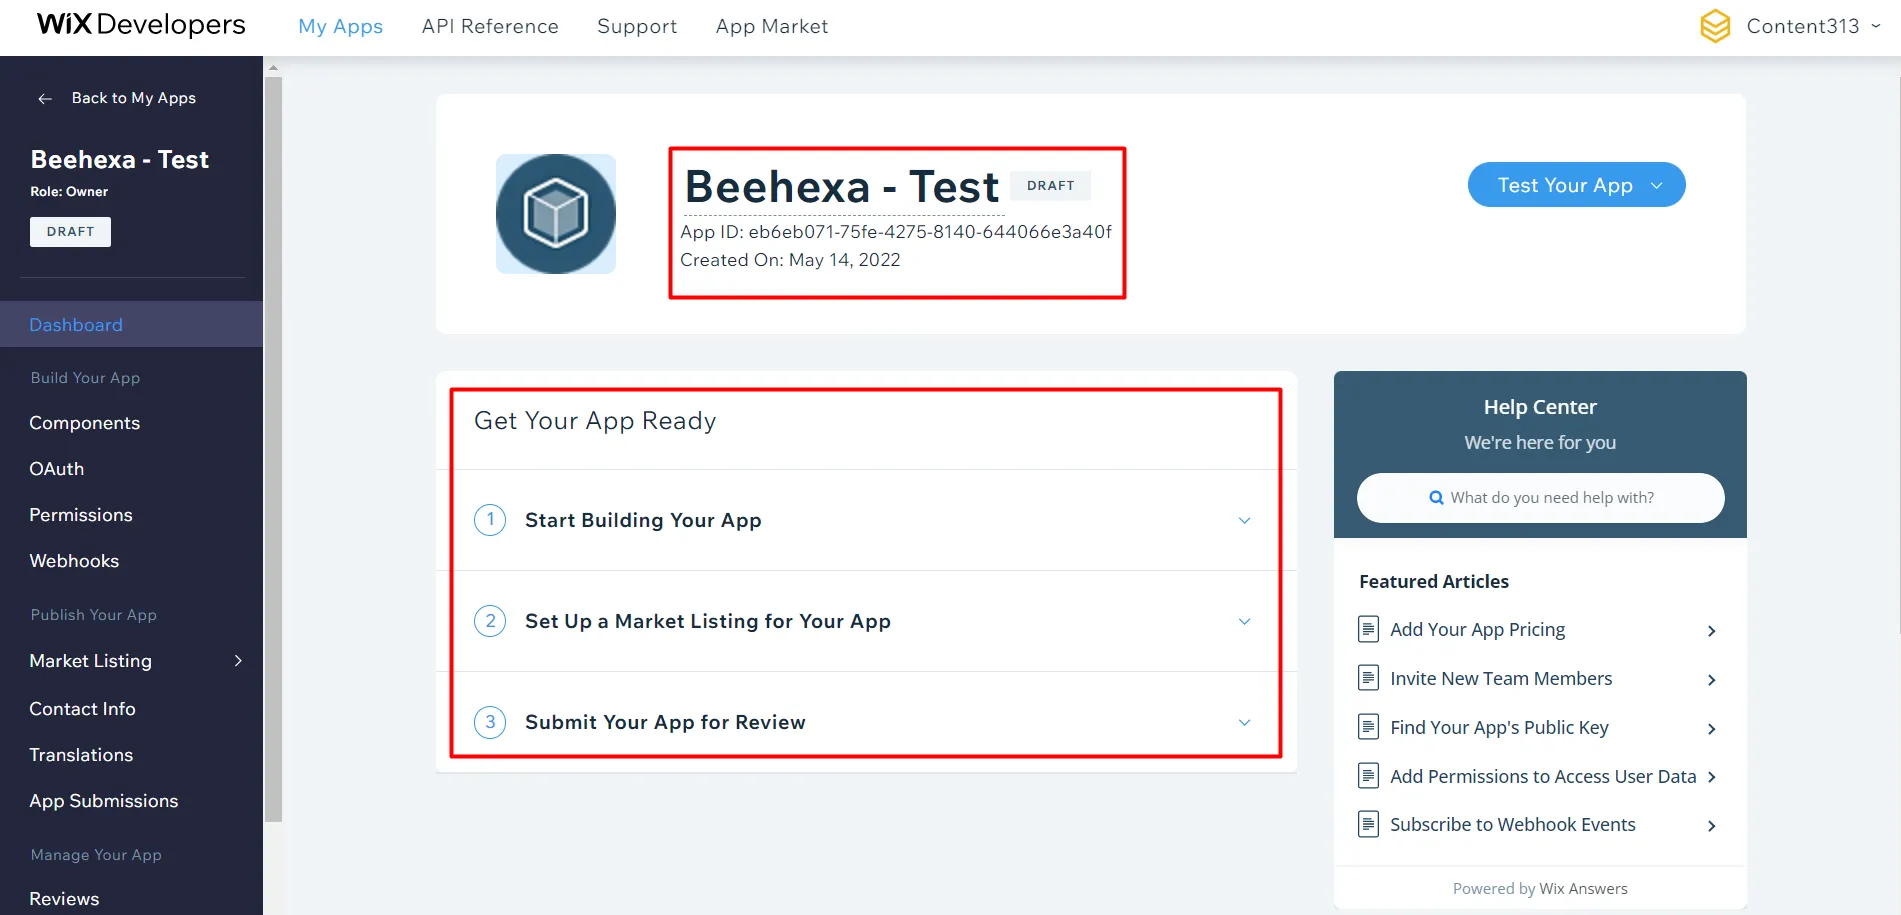
- Go to https://dev.wix.com/dc3/my-apps/.
- Click on “create new app”, then adjust the app’s name.

- Next, you need to get your app ready by reading all usage information.
- Besides, set up a market listing for your app.
- Finally, submit your App for review: It means Wix will review your app before putting it in the App Market.
Step 2: Install the app and get the token
In this step, you have to set up permissions and Oauth.
With permissions, choose the scopes you need to access your users’ data.
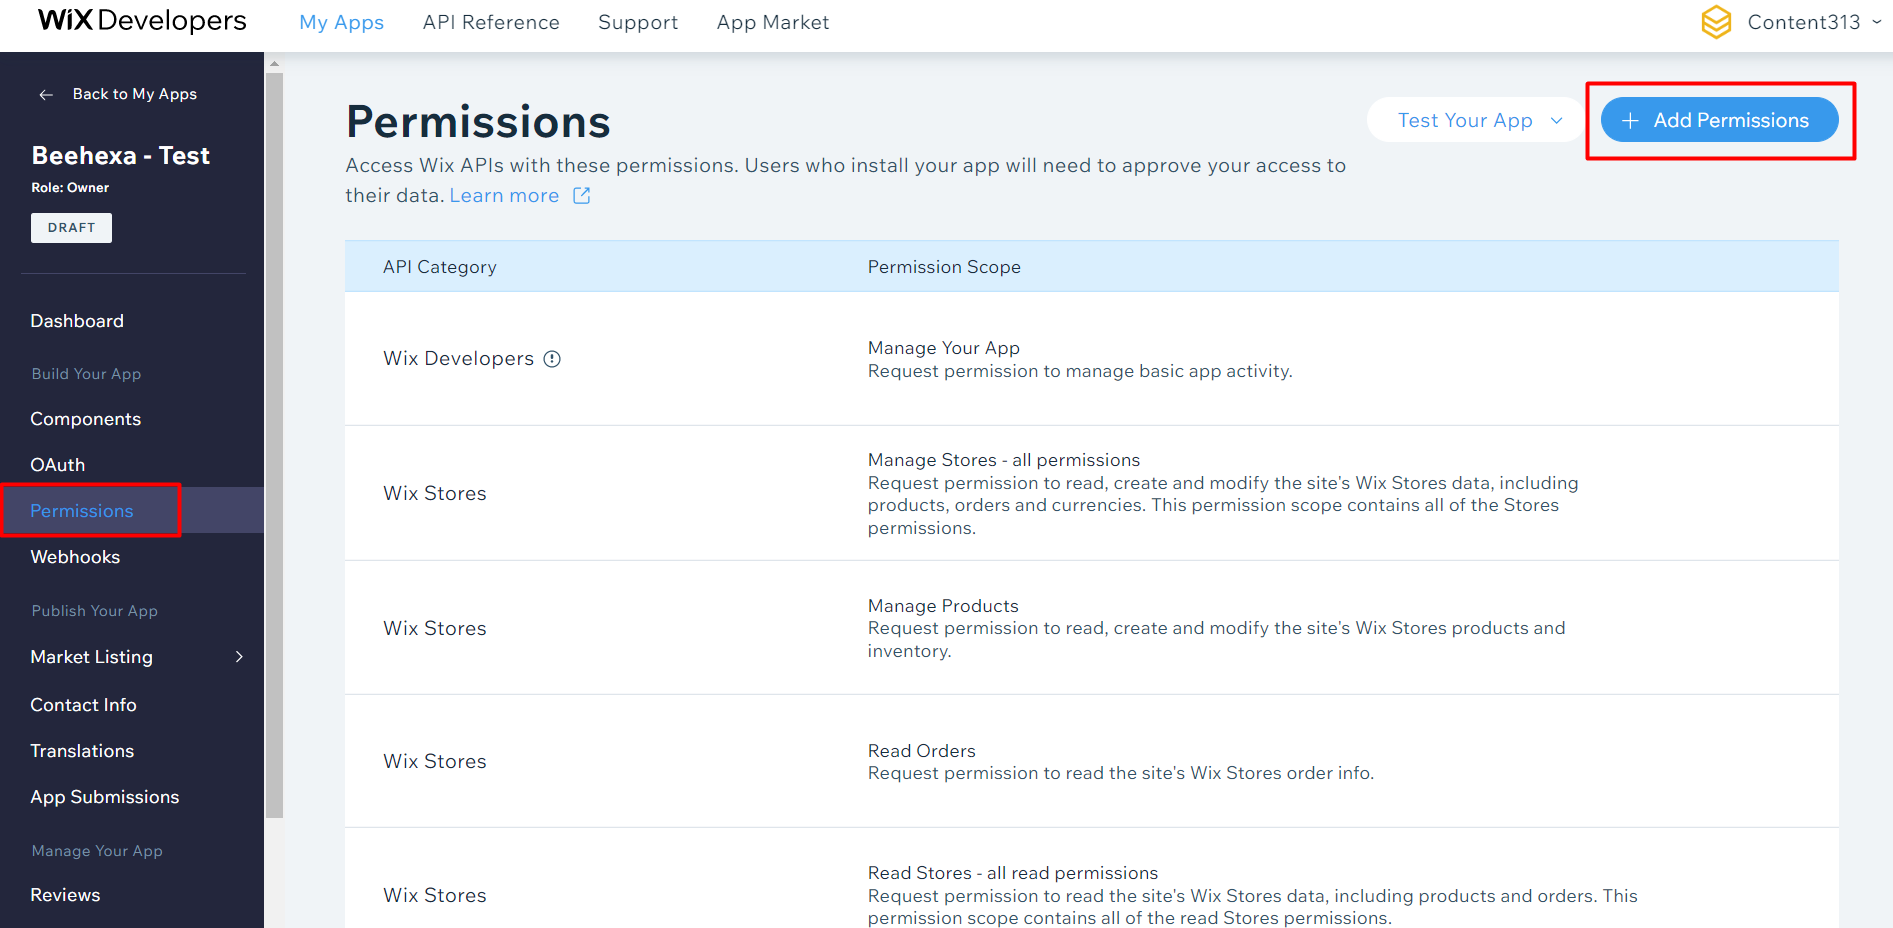
- Go to permissions in the side menu (under Build Your App).
- Click + Add Permissions.
- Choose a category, then select the permission scope.
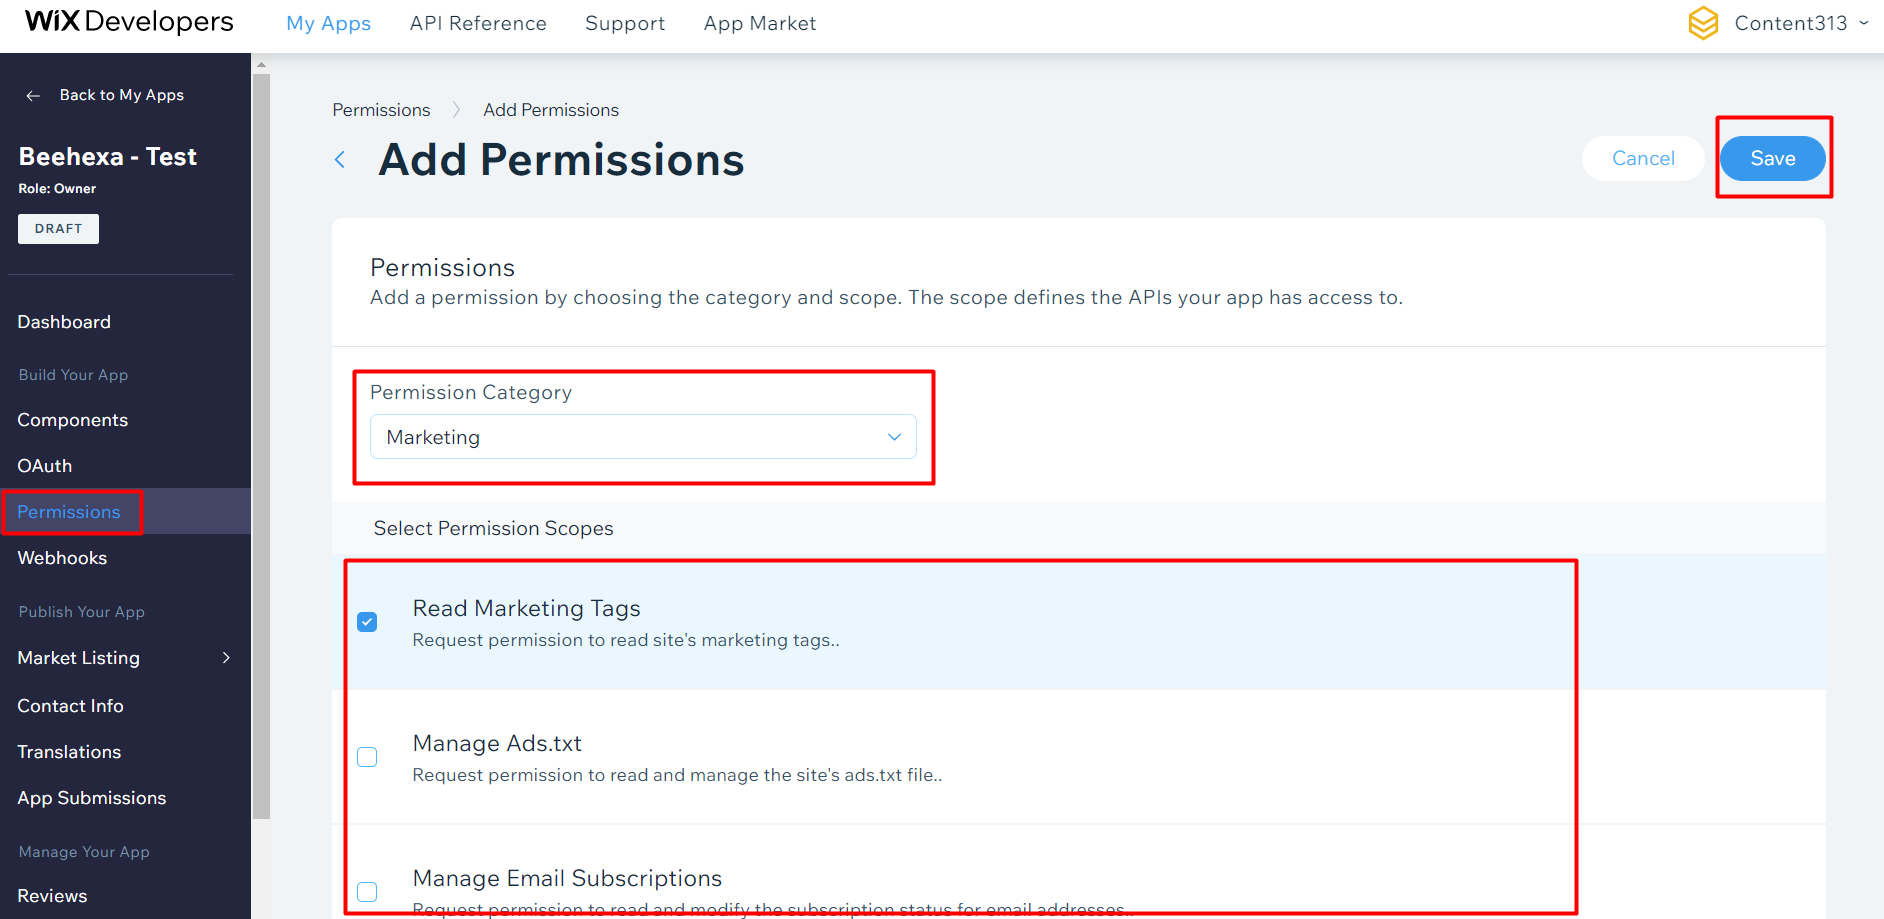
- Click Save.
Oauth is the thing used to set up data.
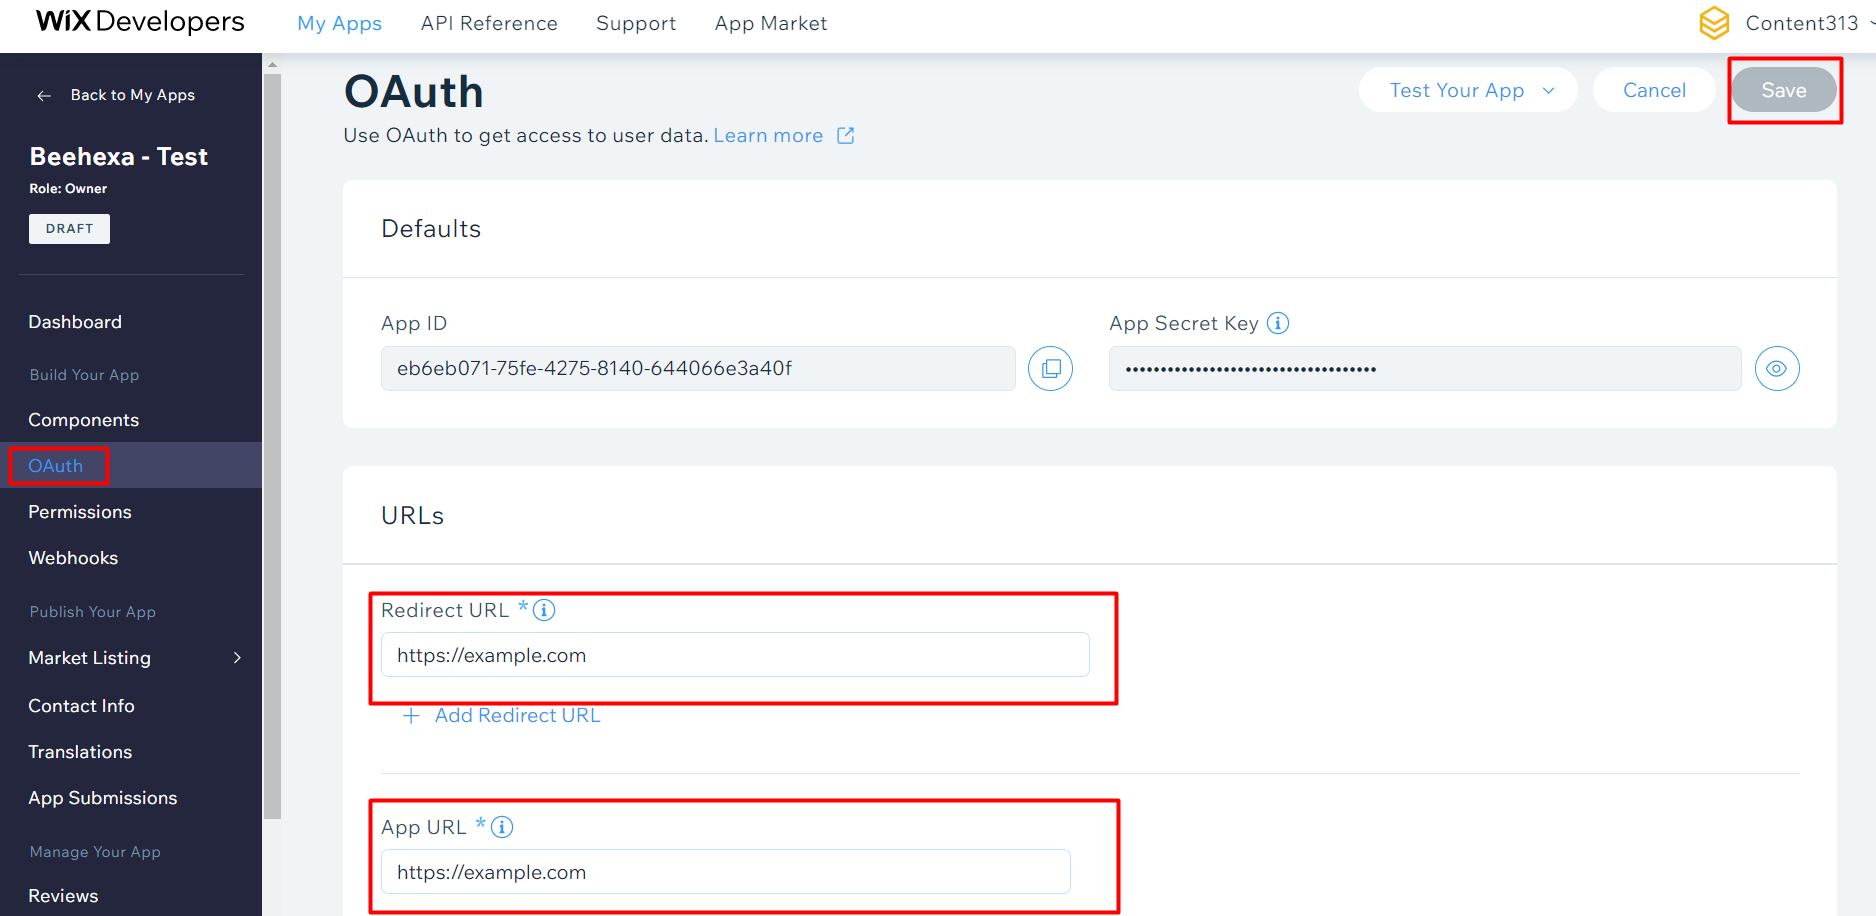
- In the Oauth, you need to add the redirect URL. During the OAuth flow, this is where you’ll collect the user’s token query parameter.
- In the App URL field, enter a URL to direct users to when they first get to your app.
After that, move to the team member and click on generate link
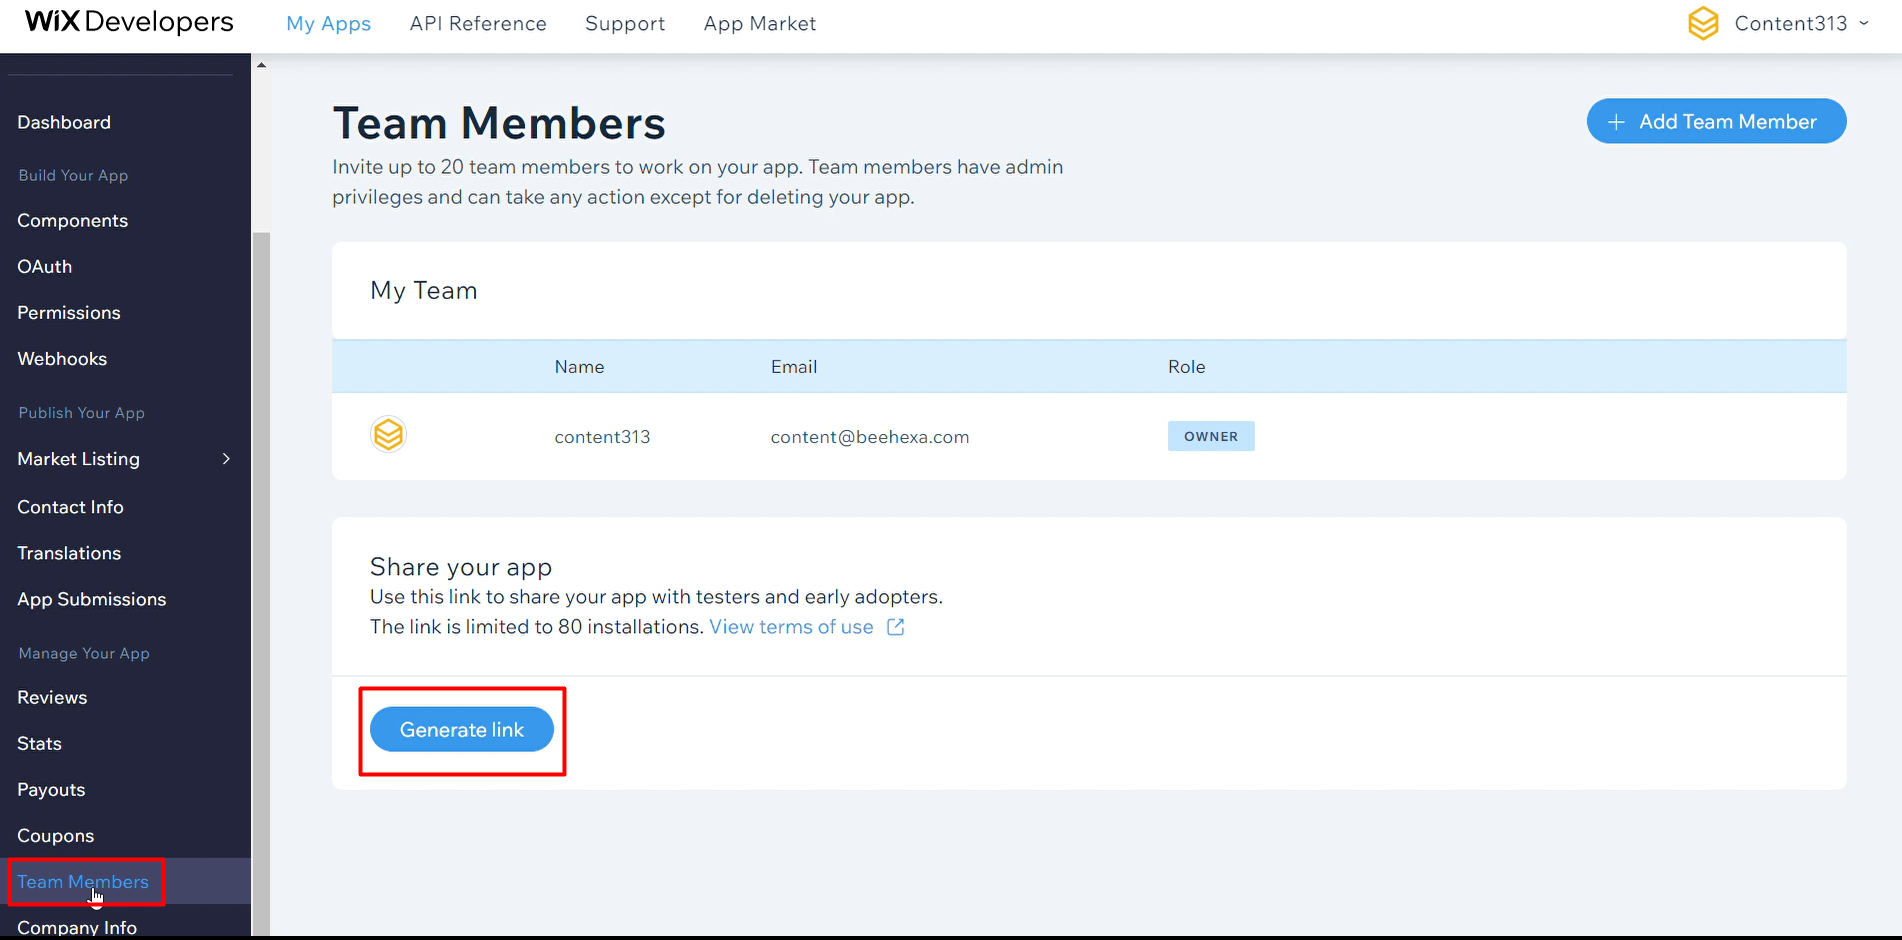
Copy this link and paste it to the new tab.
After the link is loaded, you will see the invite to try the app. Click on “Add to site”, and select the site to that you want to add the app to. After loading, the token will appear on the URL.
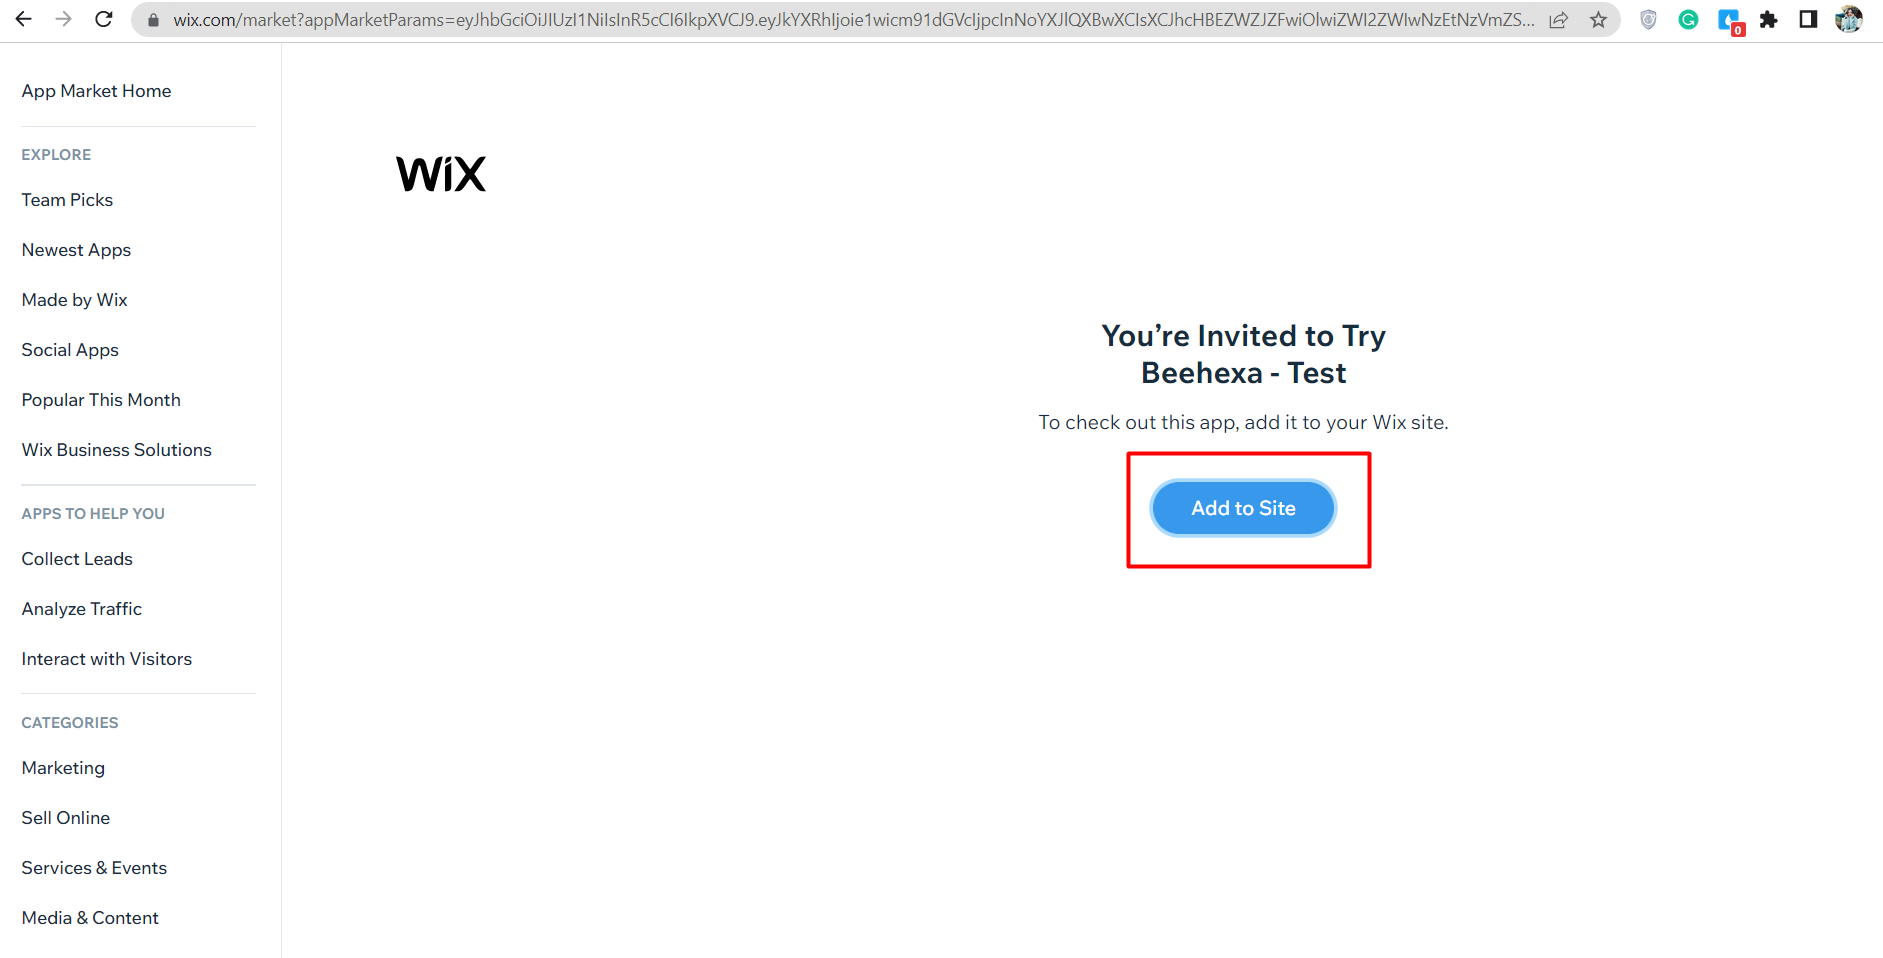
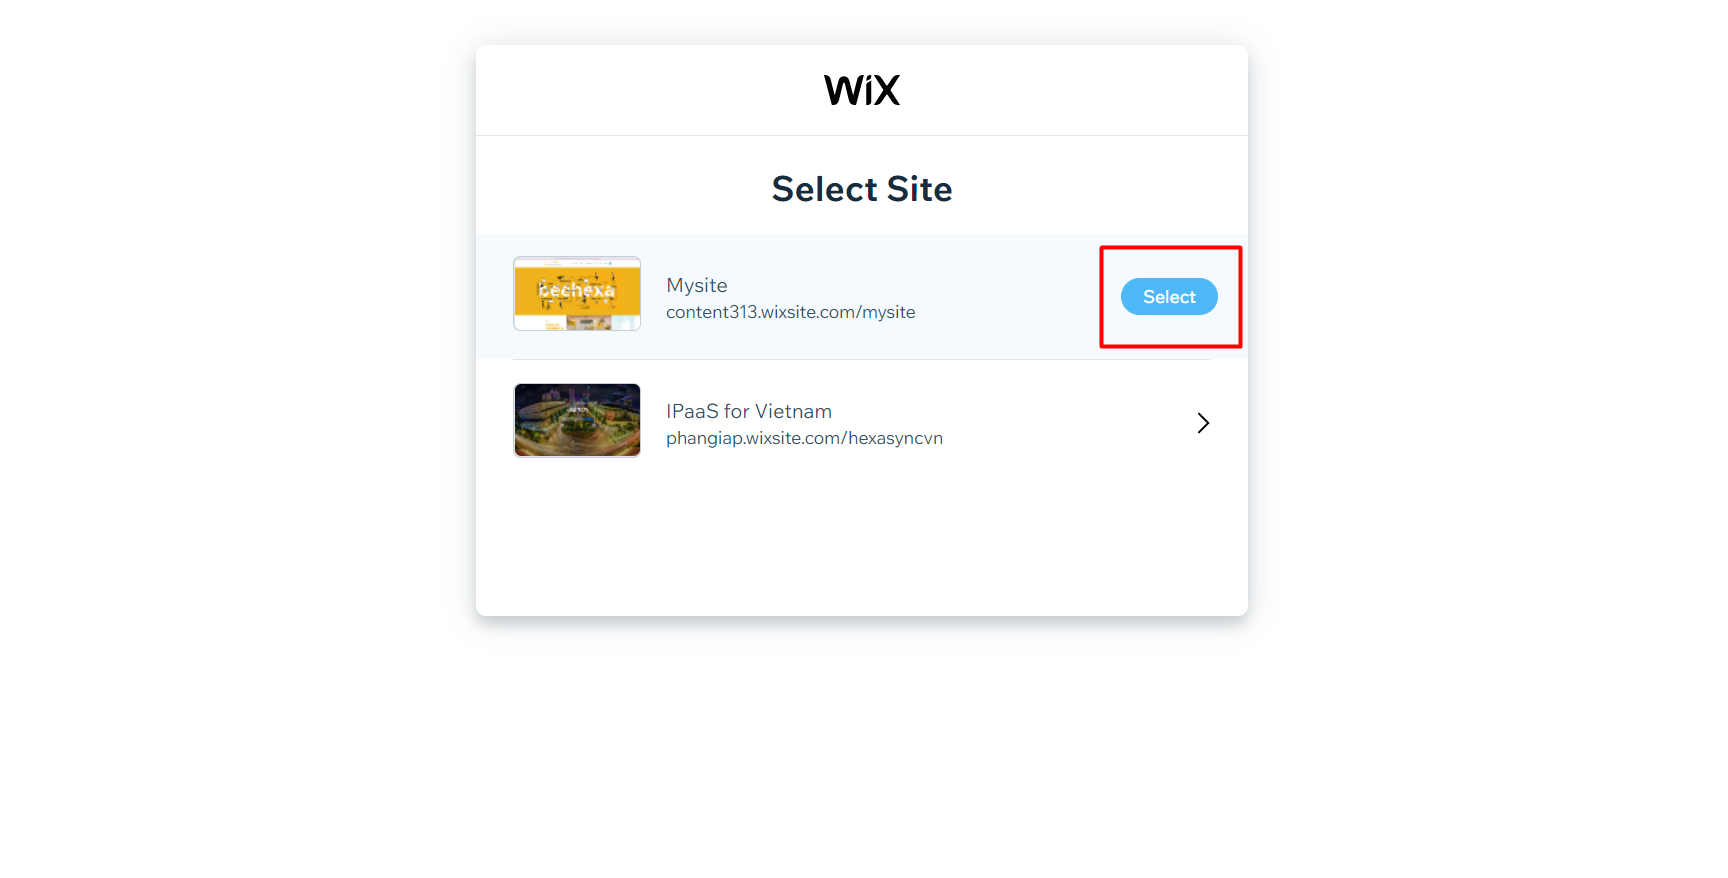
Remember to copy the token to use in the next step.

Step 3: Get the code
After taking the token, you need to install the app in multiple steps below.
To install an app, you need to access this link:
https://www.wix.com/installer/install?token=...&appId=...&redirectUrl=....As you can see, the link includes https://www.wix.com/installer/install?, token, appId, and the redirect URL. So, it would be best if you collected those parameters to access the link.
- Token: Beehexa has shown in step 2
- AppId: From the Wix Developer dashboard, go to Oauth. You can see the App Id in the default section.
- Redirect URL: From the Wix Developer dashboard, go to Oauth. You can see the redirect URL in the URL section.
After collecting those parameters, we have this link:
https://www.wix.com/installer/install?token=71eed85511f7f8497d39c10b1ff8fb1dbe8060d474ab7c5bce028783316d58050d2dd948eb2a10383fef80cc2ab1ef0047b47e929064cc59b2f748790eb8075169f1a88d0344e864217eb31567650111380e3b2bd5e631f1c62e53ec14ccb6dbe1596c7b02a4df42c8febceb77c3519c4c05fd6faf31dba8d0b7d82b43d34e977c752c7a3fa2c4134f02e4634030d53ca047f76884cf778c76c7cd2657cf805f07c825cae46ba8c5ac5fad838b7c4ccaf3c51ac83c8066326c939ef1380774d17a02f1e88e9972a09d5f07862618232de47505d47fede3527a02b7596919053e&appId=eb6eb071-75fe-4275-8140-644066e3a40f&redirectUrl=https://example.comNow, we will access the link. After the link is loaded, we will get the code on the URL. Remember to copy the code to use in the next step.

Step 4: Get the access token and refresh the access token using Postman
Get the access token
First, we will get access and refresh tokens using Postman.
- Log in to your Postman and create a new workspace.
- Create a new POST with this URL: https://www.wix.com/oauth/access

- In the body section, enter the code.
Payload:
{
    "grant_type": "authorization_code",
    "client_id": <APP_ID>,
    "client_secret": <APP_SECRET>,
    "code": <AUTH_CODE>
}
Accordingly, it would be best if you got the APP_ID, APP_SECRET, and the AUTH_CODE.
APP_ID and AUTH_CODE are directed in step 3.
Now we will get the APP_SECRET.
- From the Wix Developer dashboard.
- Go to Oauth. You can see the APP_SECRET in the default section.
Body Params:
| NAME | TYPE | DESCRIPTION |
| grant_type | String | Value must be set to “authorization_code’ |
| client_id | String | The App ID as defined in the Wix Developers Center |
| client_secret | String | The Secret Key for your app as defined in your Wix Developers Center |
| code | String | The authorization code received from us. |
- Then click SEND
Response:
The API will return the access token and the refresh token.
{
    "refresh_token": "OAUTH2.eyJraWQiOiJkZ0x3cjNRMCIsImFsZyI6IkhTMjU2In0.eyJkYXRhIjoie1wiaWRcIjpcImU1YjA2NzRiLWZiYTYtNDc4Zi1iMTJlLTgyZTA2NzRjNjA4ZlwifSIsImlhdCI6MTY1MjQ5NTk3MywiZXhwIjoxNzE1NTY3OTczfQ.EPC883WBWq6boP9N1tsWQVmJ_ItFxFI-KdAIQywvo2o",
    "access_token": "OAUTH2.eyJraWQiOiJLaUp3NXZpeSIsImFsZyI6IlJTMjU2In0.eyJkYXRhIjoie1wiYXBwSWRcIjpcImViNmViMDcxLTc1ZmUtNDI3NS04MTQwLTY0NDA2NmUzYTQwZlwiLFwiaW5zdGFuY2VJZFwiOlwiYjNlZjdlZTItMzMzYy00ZjczLThhYmQtOTBjNzdkYzZkOTM0XCIsXCJzY29wZVwiOltcIlNJVEVfU0VUVElOR1MuVklFV1wiLFwiV0lYX0RFVkVMT1BFUlMuR0VUX0VESVRPUl9ERUVQX0xJTktcIixcIldJWF9ERVZFTE9QRVJTLlNFTkRfQklfRVZFTlRTXCIsXCJXSVhfREVWRUxPUEVSUy5BUFBfUFVSQ0hBU0VfSElTVE9SWVwiLFwiU0NPUEVfU0hBUkVfVVJMLk1BTkFHRVwiLFwiV0lYX0RFVkVMT1BFUlMuQ1JFQVRFX0NIRUNLT1VUXCIsXCJXSVhfREVWRUxPUEVSUy5NQU5BR0VfQVBQX0lOU1RBTkNFXCIsXCJERVZfQ0VOVEVSLlNJVEVfUEFZTUVOVF9NRVRIT0RcIl19IiwiaWF0IjoxNjUyNDk1OTczLCJleHAiOjE2NTI0OTYyNzN9.Lj4zzdto5lTpd606STswKm-BBTMB0rRGdx3kr6Oa2-Y2IrNPxhWb0MrG3rcbxg_fNpHOc3y8JBQshIxu4V36wUEOdgSH2iMez6rZ6qlBwafkirSQBYDVxpN96ZnPG6BWufax261UrA7nZ2v725lLAjCCHeMTte0nuTMbMX8Poxlo5eCsdc-vOwepbs-QuSKTVO89hIq0PKgodVIa4htX52YTpW2GZEEVm-k6Ju0Z7qWwlmhG9CpAJXOSatg6YU4IDpF3mqBvk68J8gubfQnoeGiBR8DcXm-ZXaSlqvDIpXhTXYakSVmph5Dx_ahuBLZQXC8151oVvl2gMhDPFv11uQ"
}
Refresh the access token using Postman.
You must request a new access token whenever you call the APIs. Request new access and refresh tokens using the refresh token and your secret key.
Flowing the steps below for refreshing the access token.
- Log in to your Postman and create a new workspace.
- Create a new POST with this URL: https://www.wix.com/oauth/access

- In the body section, enter the code.
Payload:
{
    "grant_type": "refresh_token",
    "client_id": <APP_ID>,
    "client_secret": <APP_SECRET>,
    "refresh_token": <REFRESH_TOKEN>
}

Body Params:
| NAME | TYPE | DESCIPTION |
| grant_type | String | Value must be set to “refresh_token’ |
| client_id | String | The App ID as defined in the Wix Developers Center |
| client_secret | String | The Secret Key for your app as defined in your Wix Developers Center |
| refresh_token | String | The refresh token issued with the access token. |
- Then click SEND
Response:
The API will return the new access token and the refresh token in order to request a new Access Token.
{
    "refresh_token": "OAUTH2.eyJraWQiOiJkZ0x3cjNRMCIsImFsZyI6IkhTMjU2In0.eyJkYXRhIjoie1wiaWRcIjpcImU1YjA2NzRiLWZiYTYtNDc4Zi1iMTJlLTgyZTA2NzRjNjA4ZlwifSIsImlhdCI6MTY1MjQ5NTk3MywiZXhwIjoxNzE1NTY3OTczfQ.EPC883WBWq6boP9N1tsWQVmJ_ItFxFI-KdAIQywvo2o",
    "access_token": "OAUTH2.eyJraWQiOiJLaUp3NXZpeSIsImFsZyI6IlJTMjU2In0.eyJkYXRhIjoie1wiYXBwSWRcIjpcImViNmViMDcxLTc1ZmUtNDI3NS04MTQwLTY0NDA2NmUzYTQwZlwiLFwiaW5zdGFuY2VJZFwiOlwiYjNlZjdlZTItMzMzYy00ZjczLThhYmQtOTBjNzdkYzZkOTM0XCIsXCJzY29wZVwiOltcIlNJVEVfU0VUVElOR1MuVklFV1wiLFwiV0lYX0RFVkVMT1BFUlMuR0VUX0VESVRPUl9ERUVQX0xJTktcIixcIldJWF9ERVZFTE9QRVJTLlNFTkRfQklfRVZFTlRTXCIsXCJXSVhfREVWRUxPUEVSUy5BUFBfUFVSQ0hBU0VfSElTVE9SWVwiLFwiU0NPUEVfU0hBUkVfVVJMLk1BTkFHRVwiLFwiV0lYX0RFVkVMT1BFUlMuQ1JFQVRFX0NIRUNLT1VUXCIsXCJXSVhfREVWRUxPUEVSUy5NQU5BR0VfQVBQX0lOU1RBTkNFXCIsXCJERVZfQ0VOVEVSLlNJVEVfUEFZTUVOVF9NRVRIT0RcIl19IiwiaWF0IjoxNjUyNDk2MTAxLCJleHAiOjE2NTI0OTY0MDF9.A6xI5VWr0Pk1xmY256CY-RfPZawez3iVbBFd7nPqODoWiKPMbIYPnjbHzBJ2WU8WhH5Bq0tOVbzIScGvPCcZgv6LjHh6QUlWLDA1kirbQ1TSbQN4MgsX0XW7kkM5nHyp1sdrcl_fdry3qRzTPwQpgPqFsFBYg1BvCX10sk9K8C7dr0bOuPJIuBaqYL6Tnbxfoav0iviPi0oc_9J734bfUcEW7Lv6_rTnPssf7VdAQ4g19cLEnVeweEu43_kCDg7FNt5AcFKUFzX-yH00-Cr6EwFWj5AT4KMBRH8BnO08fl90eZOBGKIPdozMOHsY26m8HufIzmH4HZ24vkKX8x7Qqg"
}
The above are all steps to get the access token and refresh the access token. The next article will explore Wix rest API and multiple ways to make API calls.
If you have any wonders about Wix or want to research Wix API integration, you can visit beehexa.com. We have tons of Wix-integrated solutions for many types of business, such as Wix Amazon Integration, Wix Square Integration, Wix SAPB1 integration, or Wix Salesforce Integration.
If you have any questions, let us know in the comment below or refer to our Wix API documentation.
These steps will be shown visually in the infographic below.
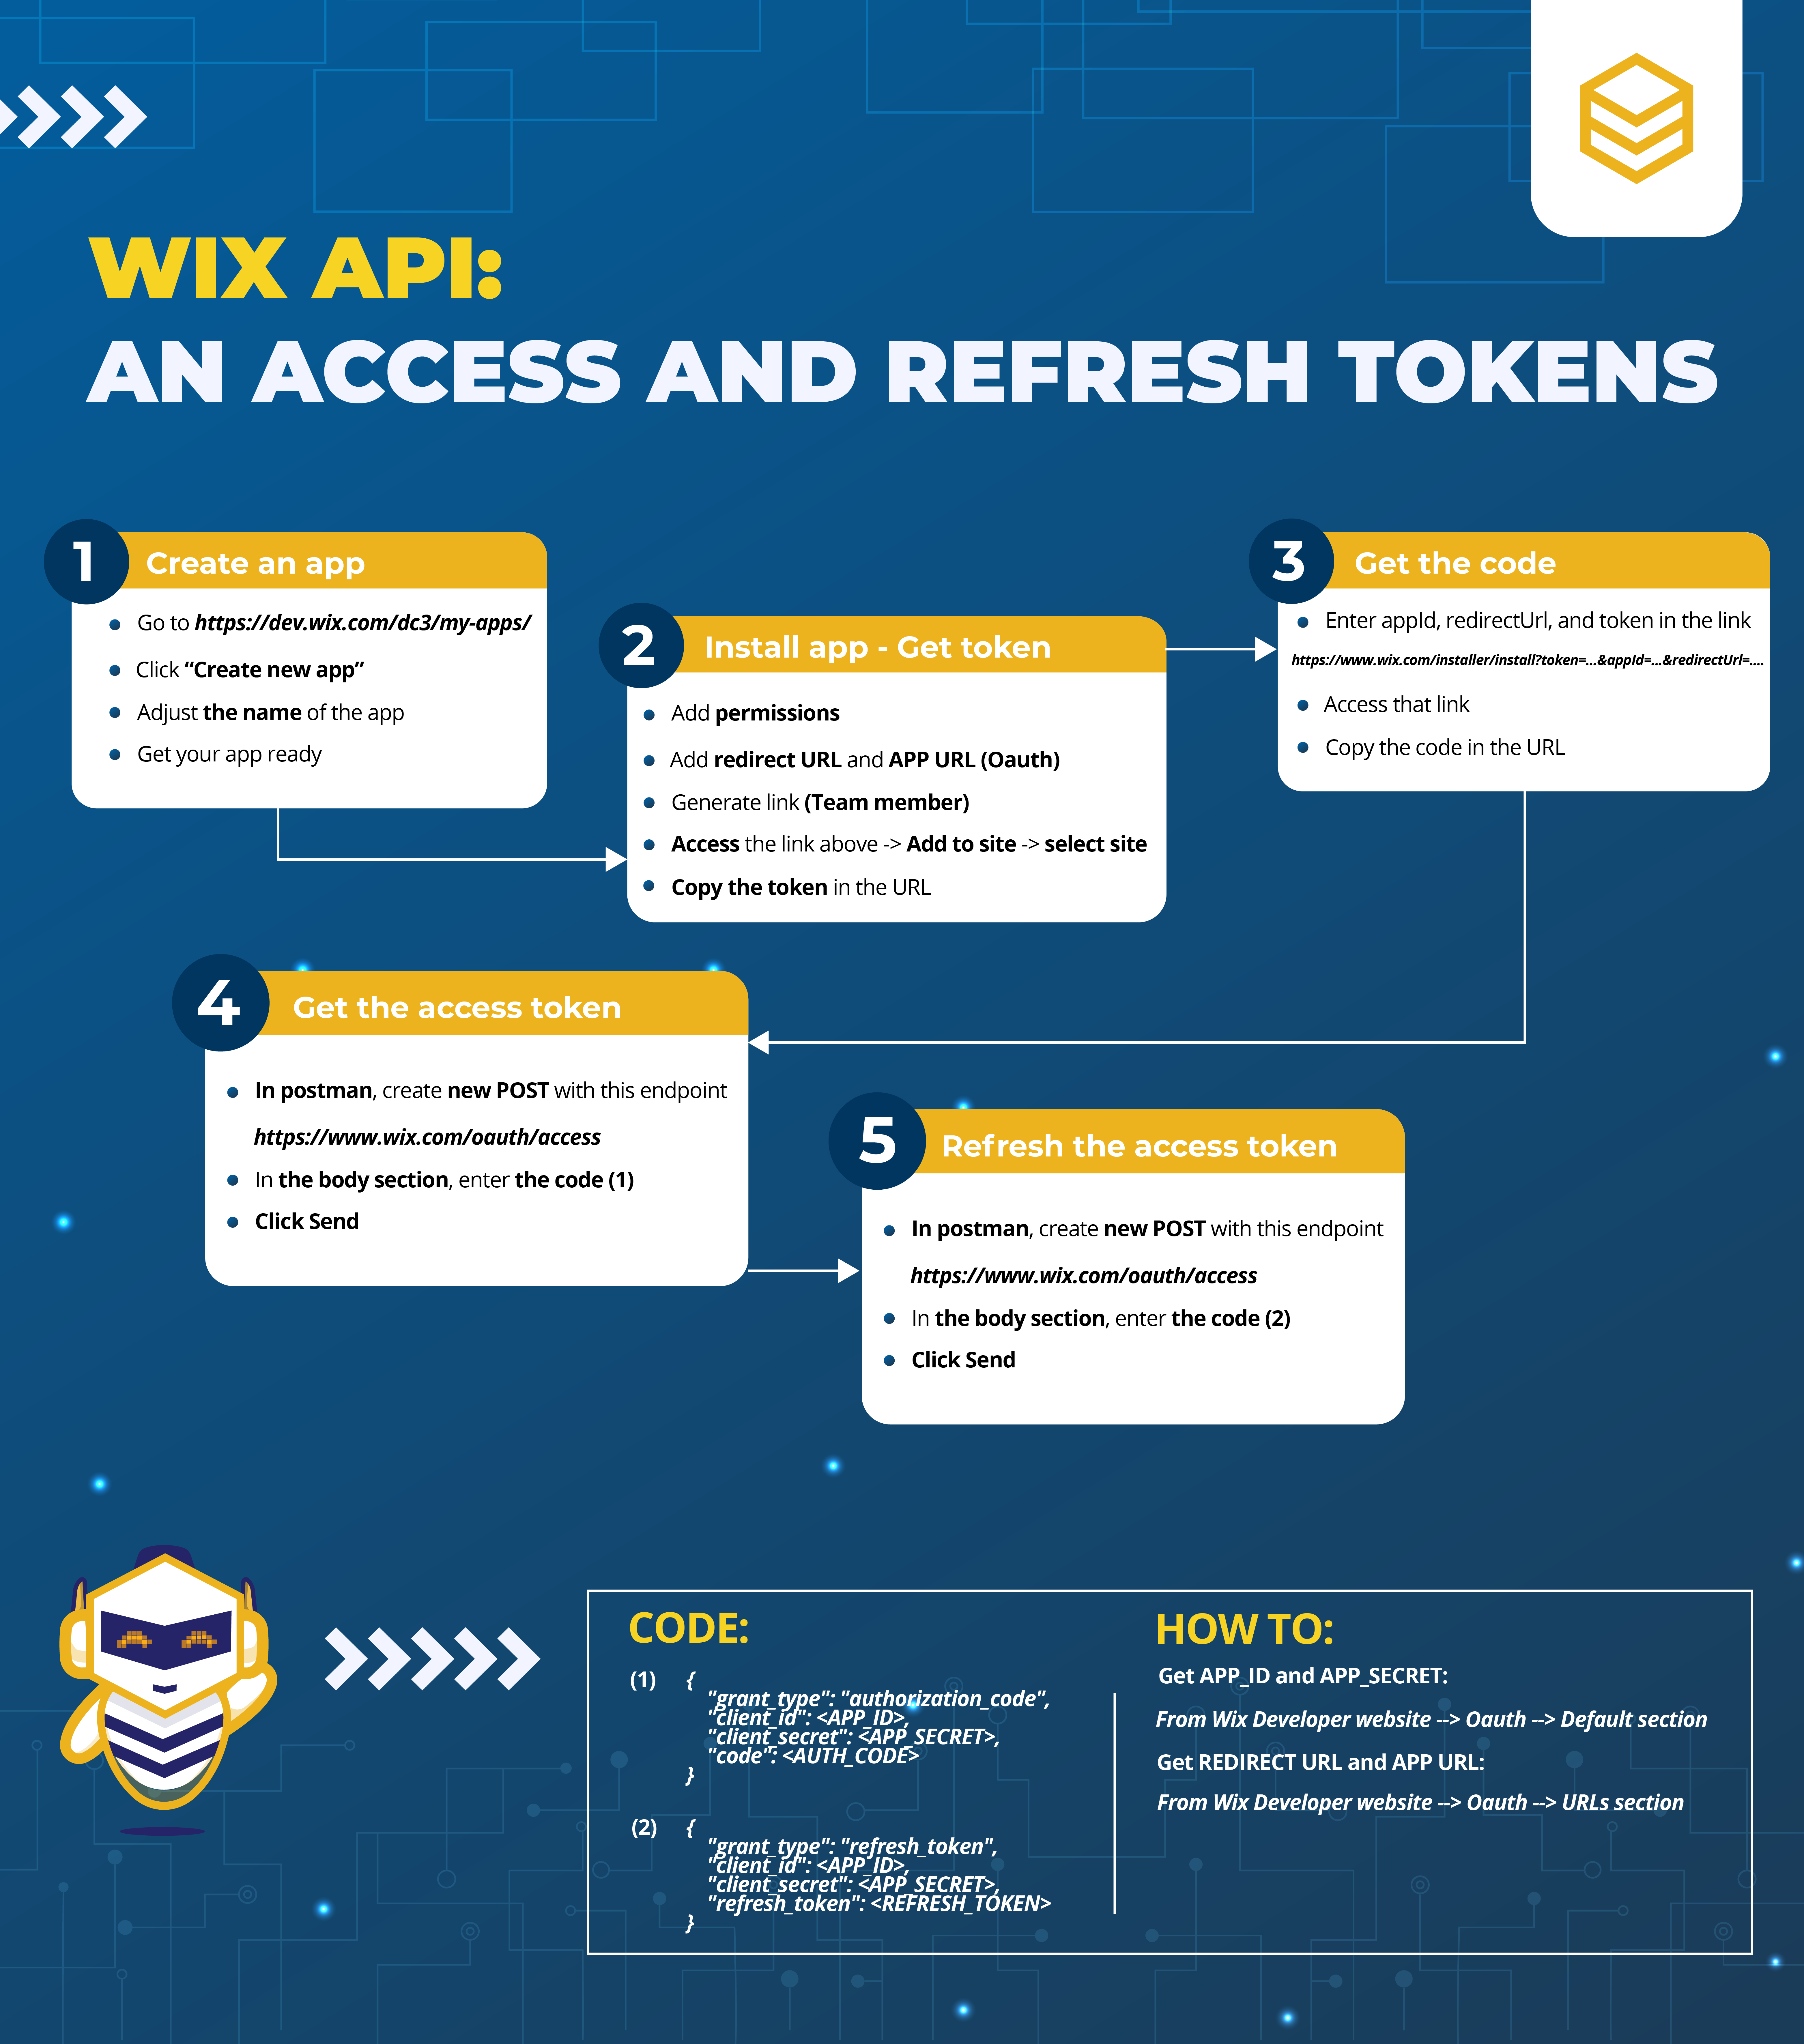
Or you can watch this video for more overview.
Hopefully, you can do it!