Overview
As you may know, Magento 2 supports six product types by default:
- Simple Product
- Configurable Product
- Grouped Product
- Virtual Product
- Bundle Product
- Downloadable Product
These powerful concepts allow Magento to support a wide range of industries and merchant needs.
In this blog, we will discover two Magento product types, and how to manage products in Magento.
Type 1: Simple Product
A simple product is a physical item with a single SKU. Simple products have a variety of pricing and of input controls which makes it possible to sell variations of the product.
How to create Simple Products in Magento 2?
Step 1: Choose the product type
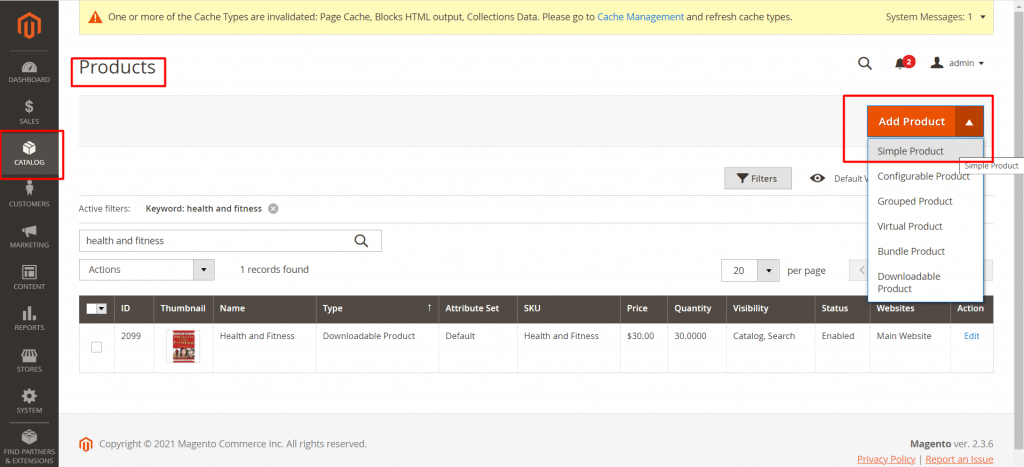
- On the Admin sidebar, go to Catalog > Products.
- On the Add Product menu at the upper-right, choose Simple Product.
Step 2: Choose the attribute set
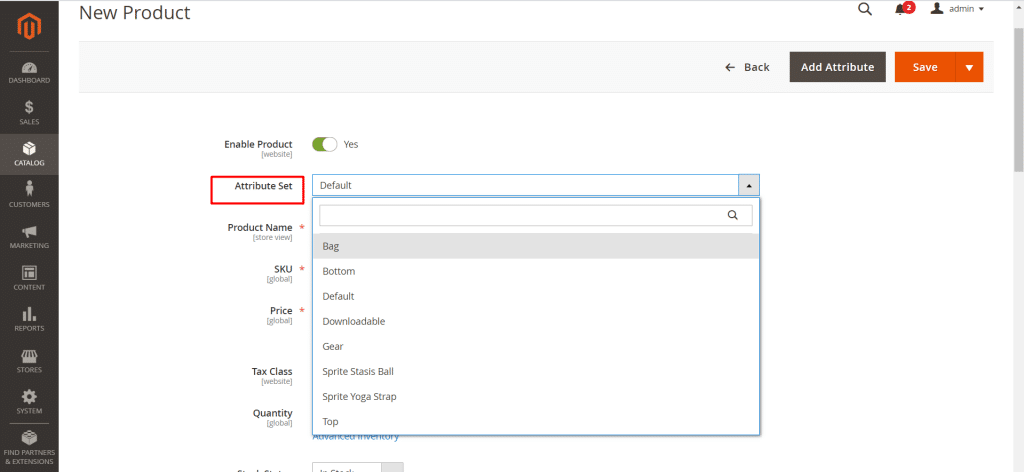
To choose the attribute set that is used as a template for the product, do one of the following:
- For Search, enter the name of the attribute set.
- In the list, choose the attribute set that you want to use.
The form is updated to reflect the change.
Step 3: Complete the required settings
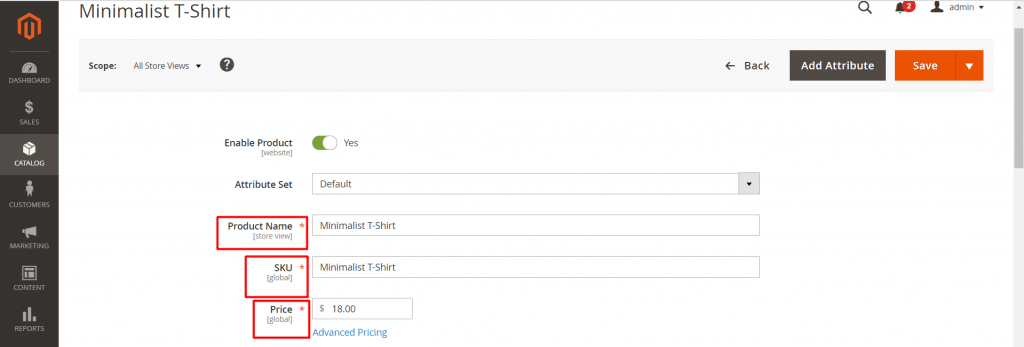
- Enter the Product Name.
- Accept the default SKU that is based on the product name or enter another.
- Enter the product Price.
Step 4: Complete the basic settings
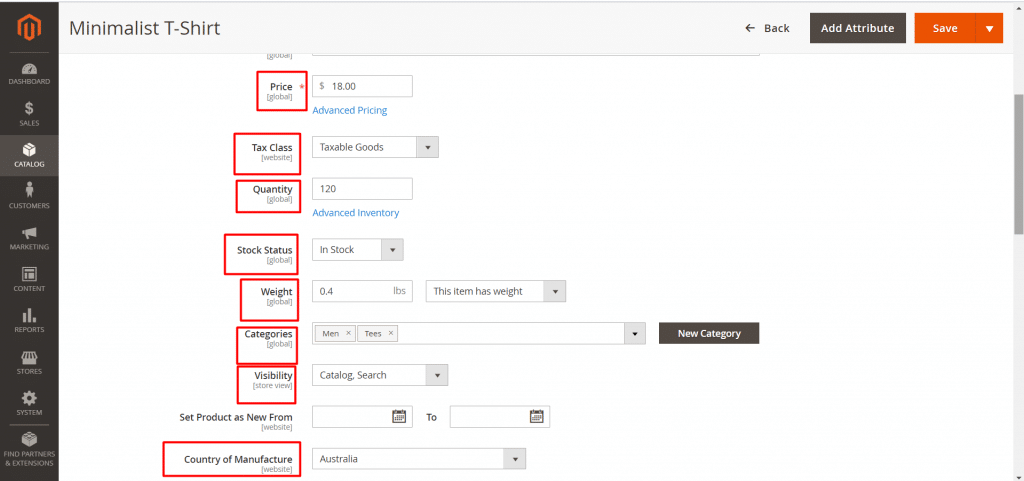
- Set Tax Class to one of the following:
- None
- Taxable Goods
- Enter the Quantity of the product that is currently in stock.
(By default, Stock Status is set to In Stock)
3. Enter the Weight of the product.
4. Accept the default Visibility setting of Catalog, Search.
5. To assign Categories to the product, click the Select… box and do either of the following:
- Choose an existing category:
- Start typing in the box to find a match.
- Select the checkbox of each category that is to be assigned.
- Create a new category:
- Click New Category.
- Enter the Category Name and choose the Parent Category to determine its position in the menu structure.
- Click Create Category.
6. Choose the Country of Manufacture.
Step 5: Complete the product information
Scroll down and complete the information in the following sections as needed:
- Content
- Images and Videos
- Related Products, Up-Sells, and Cross-Sells
- Search Engine Optimization
- Customizable Options
- Products in Websites
- Design
- Gift Options
Step 6: Publish the product
If you are ready to publish the product in the catalog, set the Enable Product switch to Yes.
Step 7: Verify the result
In Admin sidebar, go to Catalog > Products. Search for: Minimalist T-Shirt
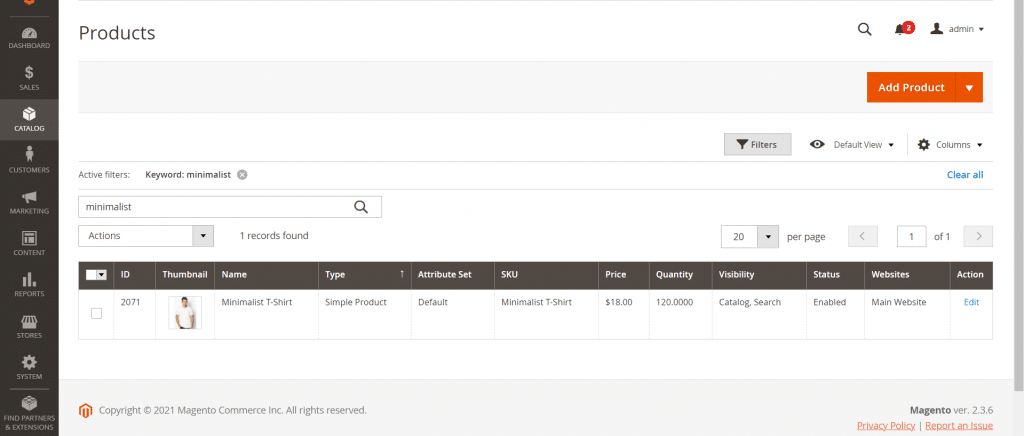
In Storefront Product Page, search for Minimalist T-Shirt
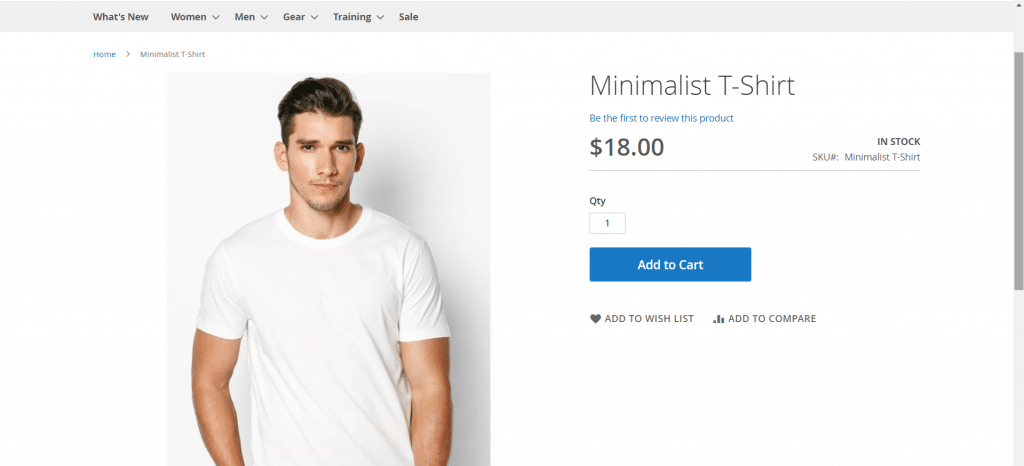
For a more overview, you can refer to the video tutorial below to custom your settings in Magento 2:
Type 2: Configurable Product
Configurable Product includes many simple products. The collection of various products with different options of colors and sizes but every single product has a separate SKU.
How to create a Configurable Product in Magento 2?
Step 1: Choose the product type
- On the Admin sidebar, go to Catalog > Products.
- On the Add Product menu at the upper-right corner, choose Configurable Product.
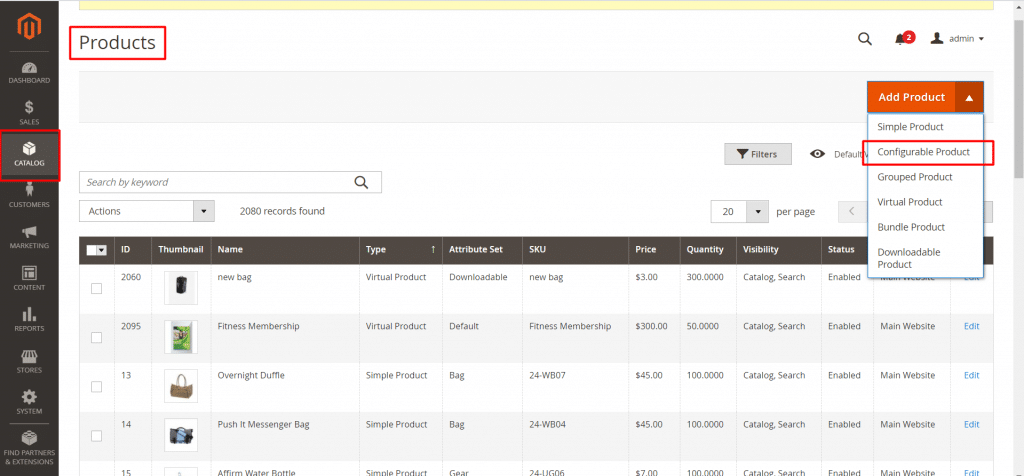
Step 2: Choose the attribute set
- To choose the attribute set for the product, click the field at the top of the page and do one of the following:
- For Search, enter the name of the attribute set.
- In the list, choose the attribute set that you want to use.
- If you need to add an additional attribute to the attribute set, click Add Attribute and follow the instructions in Adding an Attribute.
Step 3: Complete the required settings
- Enter the Product Name.
- Accept the default SKU that is based on the product name or enter another.
- Enter the product Price.
Step 4: Complete the basic settings
- Set Tax Class to one of the following:
- None
- Taxable Goods
- The Quantity is determined by the product variations, so you can leave it blank.
- Leave the Stock Status as set.
- The Stock Status of a configurable product is determined by each associated configuration. Because the product was saved without entering a quantity, the Stock Status is set to Out of Stock.
- Enter the product Weight.
- Accept the default Visibility setting of Catalog, Search.
- To feature the product in the list of new products, select the Set Product as New checkbox.
- To assign Categories to the product, click the Select… box and do either of the following:
- Choose an existing category:
- Start typing in the box to find a match.
- Select the checkbox of each category that is to be assigned.
- Create a new category:
- Click New Category.
- Enter the Category Name and choose the Parent Category to determine its position in the menu structure.
- Click Create Category.
8. Choose the Country of Manufacture.
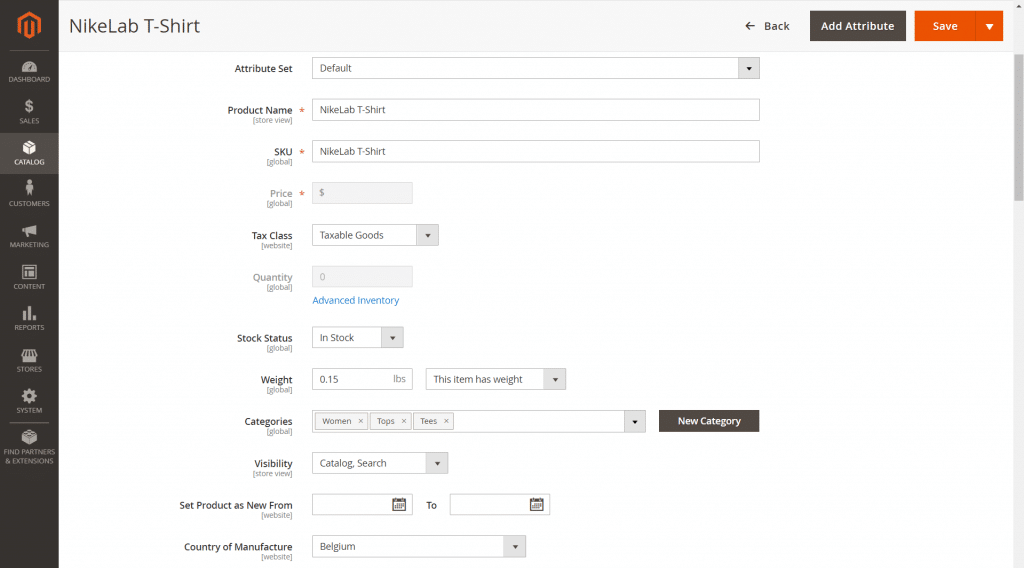
In the next steps, we will set up the configurations for each variation of the product.
Adding configurations:
The following example shows how to add configurations for three colors and three sizes. In all, nine simple products will be created with unique SKUs to cover every possible combination of variations.
The progress bar at the top of the page shows where you are in the process and guides you through each step.

Step 1: Choose the attributes
- Continuing from above, scroll down to the Configurations section and click Create Configurations.
- Select the checkbox of each attribute that you want to include as a configuration. (For this example, we choose color and size.)
- The list includes all attributes from the attribute set that can be used in a configurable product.
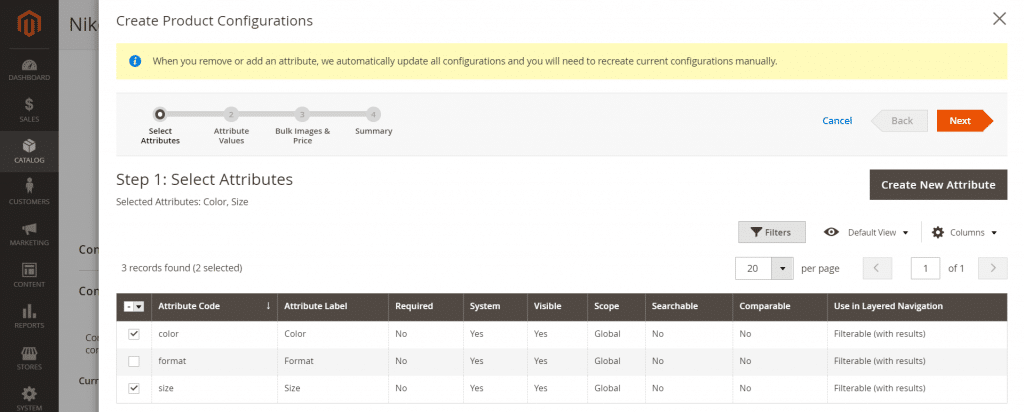
4. If you need to add a new attribute, click Create New Attribute and do the following:
- Complete the attribute properties.
- Click Save Attribute.
- Select the checkbox to select the attribute.
5. In the upper-right corner, click Next.
Step 2: Enter the attribute values
- For each attribute, select the checkbox of the values that apply to the product.
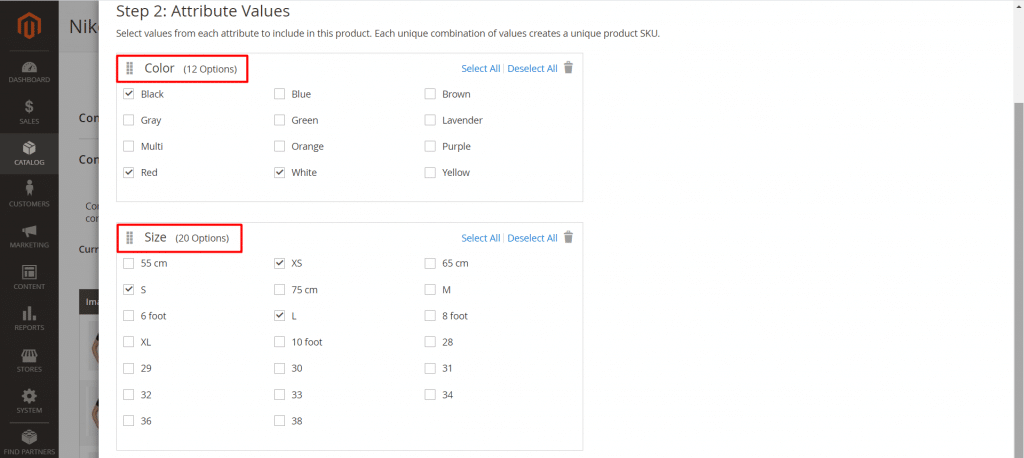
2. To rearrange the attributes, grab the Change Order icon and move the section to a new position.
The order determines the position of the drop-down lists on the product page.
3. In the progress bar, click Next.
Step 3: Configure the images, price, and quantity
This step determines the images, pricing, and quantity of each configuration.
- Use one of the following methods to configure the images:
- Method 1: Apply a single set of images to all SKUs.
- Method 2: Apply unique images for each SKU.
(For this example, we choose unique images)
- Use one of the following methods to configure the prices:
- Method 1: Apply the same price to all SKUs.
- Method 2: Apply a different price for each SKU.
(For this example, we choose the same price)
- Use one of the following methods to configure the quantity:
- Method 1: Apply the same quantity to all SKUs.
- Method 2: Apply Different Quantity by Attribute.
(For this example, we choose the same quantity)
When the configuration for images, price, and quantity is complete, click Next in the upper-right corner.
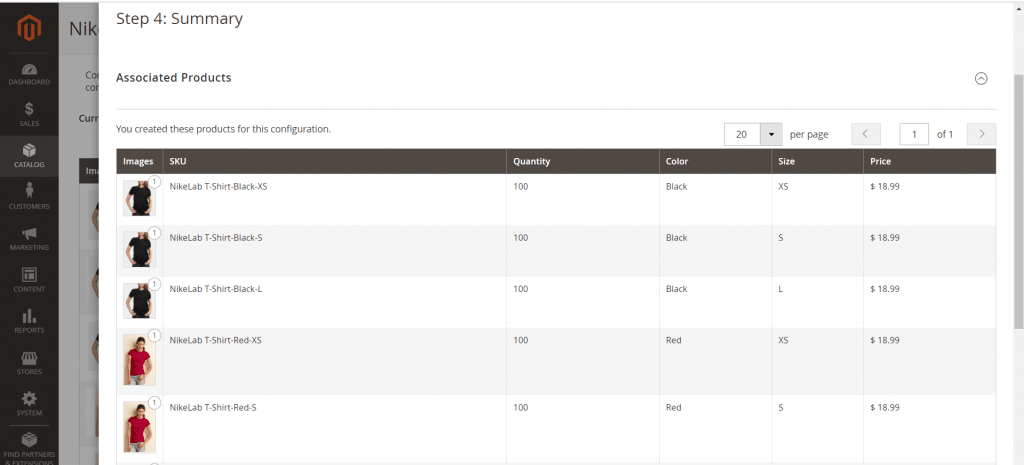
Step 4: Generate the product configurations
Wait a moment for the list of products to appear and do one of the following:
- If you are satisfied with the configurations, click Next.
- To make corrections, click Back.
The current product variations appear at the bottom of the Configuration section.
Step 5: Add a product image
- Scroll down and expand the Images and Videos section.
- Click the Camera tile and browse to the main image that you want to use for the configurable product.
Step 6: Complete the product information
Scroll down and complete the information in the following sections as needed:
- Content
- Related Products, Up-Sells, and Cross-Sells
- Search Engine Optimization
- Customizable Options
- Products in Websites
- Design
- Gift Options
Step 7: Publish the product
If you are ready to publish the product in the catalog, set the Enable Product switch to Yes.
Step 8: Verify the result
In the Admin sidebar, go to Catalog > Products. Search for: Nikelab T-Shirt
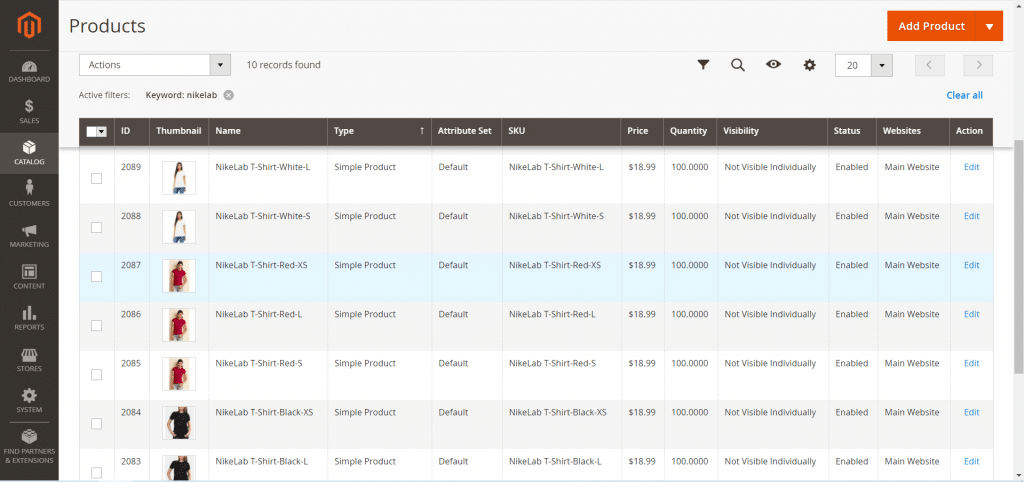
In Storefront Product Page, search for Nikelab T-Shirt
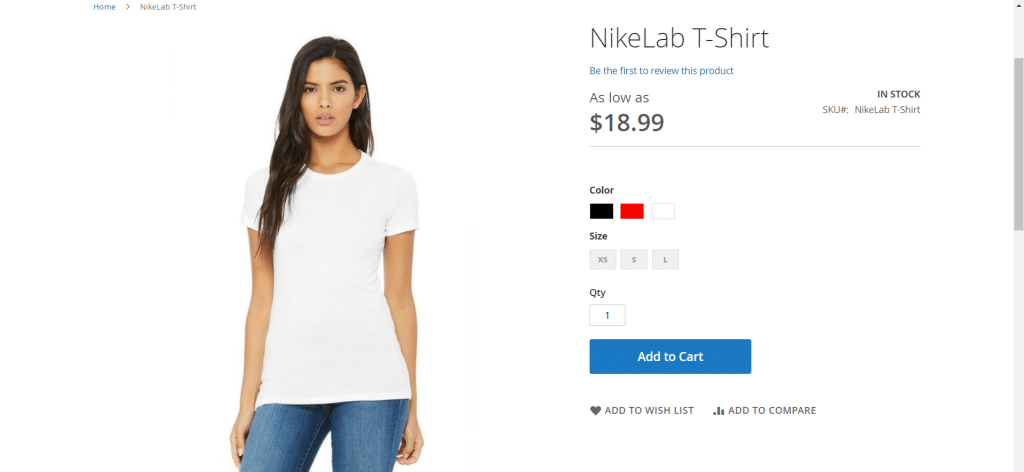
For a more overview, you can refer to the video tutorial below to custom your settings in Magento 2:
Summary:
- Simple products can be included in the configurable, bundle, and grouped product types.
- A simple product can have custom options with a variety of input controls, which makes it possible to sell many product variations from a single SKU.
- A configurable product allows the shopper to choose options from the drop-down, multiple select, visual swatch, and text swatch input types. Each option is a separate, simple product.
Above is the tutorial of two product types in Magento 2: Simple Product and Configurable Product. With this MAGENTO 2 guide, we hope you should be able to create and manage Magento-related products.
In the next blog, we will discover two other product types of Magento 2 which are Grouped product and Virtual product. For more details, you can refer to Magento 2 User Guide.